We've gone through creating an attribute key and a custom attribute type, and this is likely sufficient for most developers. However, if you have a completely custom object and would like to add support for attributes to this object, you'll have to completely an attribute category for this object, some associated Doctrine ORM entities, and add getAttribute() and setAttribute() support to your object. Let's walk through how that is done.
Package
It's recommended that you create your custom attribute category as part of a package, so that it can be installed and uninstalled easily. If you haven't done much work with packages, you'll want to read the extensive package documentation.
Let's say you've created a package named "Calendar" that is found at packages/calendar, and it contains a custom object named "MyCal\Entity\Calendar\Event" that you'd like to add attributes to. This Event class is also a Doctrine ORM entity. Let's walk through how that's done.
Version Requirements
Note: you must ensure that your package controller sets the minimum Concrete CMS version to 8.0 or greater.
Setup the Entities
First, you'll want to create an event Key and Value entity, Concrete\Package\Calendar\Entity\Attribute\Key\EventKey and Concrete\Package\Calendar\Entity\Attribute\Value\EventValue. These should be found here
packages/calendar/src/Concrete/Entity/Attribute/Key/EventKey
packages/calendar/src/Concrete/Entity/Attribute/Value/EventValue
These should extend Concrete\Core\Entity\Attribute\Key\Key and Concrete\Core\Entity\Attribute\Value\AbstractValue, respectively. They also need to be Doctrine ORM objects. Here is an example EventKey:
<?php
namespace Concrete\Package\Calendar\Entity\Attribute\Key;

use Concrete\Core\Entity\Attribute\Key\Key;
use Doctrine\ORM\Mapping as ORM;

/**
 * @ORM\Entity
 * @ORM\Table(name="CalendarEventAttributeKeys")
 */
class EventKey extends Key
{

    public function getAttributeKeyCategoryHandle()
    {
        return 'event';
    }
}
The key object requires that a subclassed getAttributeKeyCategoryHandle() method return the handle of the attribute key category.
And here is an example CalendarValue:
<?php
namespace Concrete\Package\Calendar\Entity\Attribute\Value;

use Concrete\Core\Entity\Attribute\Value\AbstractValue;
use Doctrine\ORM\Mapping as ORM;

/**
 * @ORM\Entity
 * @ORM\Table(
 *     name="CalendarEventAttributeValues"
 * )
 */
class EventValue extends AbstractValue
{
    /**
     * @ORM\ManyToOne(targetEntity="\MyCal\Entity\Calendar\Event")
     * @ORM\JoinColumn(name="eventID", referencedColumnName="eventID")
     */
    protected $event;

    /**
     * @return mixed
     */
    public function getEvent()
    {
        return $this->event;
    }

    /**
     * @param mixed $event
     */
    public function setEvent($event)
    {
        $this->event = $event;
    }
}
(Note: In this example, the MyCal\Entity\Calendar\Event object's primary key is eventID, which is also a column on this table as well.)
Here we are creating CalendarEventAttributeValues database table that will have a column for eventID, and all the base attribute value fields (like akID for attribute key and avID for the attribute generic value.) If we pass our custom MyCal\Entity\Calendar\Event object to setEvent() Doctrine will automatically translate it to eventID, and vice versa when retrieving the data from the database.
These two entities will store everything about our custom attributes. Any special calendar event keys added will be stored in the CalendarEventAttributeKeys database table, and any attribute values set against the calendar event object will be stored in the CalendarEventAttributeValues table.
Create the Category Controller Class
Now we need to create the category controller class that handles listing and assigning attribute keys and values. The namespace for this class should be Concrete\Package\Calendar\Attribute\Category\EventCategory, and it should be found at packages/calendar/src/Concrete/Attribute/Category/EventCategory.
This class must implement the Concrete\Core\Attribute\Category\CategoryInterface. The easiest way to accomplish this is to extend the Concrete\Core\Attribute\Category\AbstractStandardCategory, and implement the category-specific methods. Here's an example of a finished category.
<?php
namespace Concrete\Package\Calendar\Attribute\Category;

use Concrete\Core\Entity\Attribute\Key\Key;
use Concrete\Package\Calendar\Entity\Attribute\Key\EventKey;
use Concrete\Package\Calendar\Entity\Attribute\Value\EventValue;

class EventCategory extends AbstractStandardCategory
{

    public function createAttributeKey()
    {
        return new EventKey();
    }

    public function getIndexedSearchTable()
    {
        return 'CalendarEventSearchIndexAttributes';
    }

    public function getIndexedSearchPrimaryKeyValue($event)
    {
        return $mixed->getCalendarEventID();
    }

    public function getSearchIndexFieldDefinition()
    {
        return array(
            'columns' => array(
                array(
                    'name' => 'eventID',
                    'type' => 'integer',
                    'options' => array('unsigned' => true, 'default' => 0, 'notnull' => true),
                ),
            ),
            'primary' => array('eventID'),
        );
    }

    public function getAttributeKeyRepository()
    {
        return $this->entityManager->getRepository(EventKey::class);
    }

    public function getAttributeValueRepository()
    {
        return $this->entityManager->getRepository(EventValue::class);
    }

    public function getAttributeValues($event)
    {
        $values = $this->getAttributeValueRepository()->findBy(array(
            'event' => $event,
        ));
        return $values;
    }

    public function getAttributeValue(Key $key, $event)
    {
        $r = $this->entityManager->getRepository(EventValue::class);
        $value = $r->findOneBy(array(
            'event' => $event,
            'attribute_key' => $key,
        ));

        return $value;
    }
}
Let's walk through this. First, we define our createAttributeKey method to return an instance of the attribute key entity we created earlier. Next, we tell the core search indexer what database table we're going to use for our indexing. The next two methods inform the standard search indexer how to get the primary key for each row from the passed object (in this case, an instance of our MyCal\Entity\Calendar\Event object), and how to set up that field. Next, we define the key and value repositories for the entities we created earlier. Finally, we tell our category how to get all attribute values for a given event object, and how to retrieve a specific attribute value object for a given key/event pair.
Register the Attribute Category Driver
Now that you've created your entities and the category controller class, you need to register you attribute category with Concrete. This should happen from within the on_start() method of your package's controller.
public function on_start()
{
    $this->app['manager/attribute/category']->extend('event',
    function($app) {
        return $app->make('Concrete\Package\Calendar\Attribute\Category\EventCategory');
    });
}
Setup the Dashboard Pages
Next, let's set up the dashboard pages where we will actually list, add, update and delete our event attribute keys. You'll have to be familiar with Dashboard Pages and Single Pages in order to do this.
First, determine where you want the page to live. In our package, we're creating our page at /dashboard/calendar/attributes. That means creating the controller at Concrete\Package\Calendar\Controller\SinglePage\Dashboard\Calenar\Attributes. It should look like this:
<?php
namespace Concrete\Package\Calendar\Controller\SinglePage\Dashboard\Calendar;

use Concrete\Core\Attribute\Key\Category;
use Concrete\Core\Attribute\Type;
use Concrete\Core\Page\Controller\DashboardAttributesPageController;

class Attributes extends DashboardAttributesPageController
{
    protected function getCategoryObject()
    {
        return Category::getByHandle('event');
    }

    public function view()
    {
        $this->renderList();
    }

    public function edit($akID = null)
    {
        $key = $this->getCategoryObject()->getController()->getByID($akID);
        $this->renderEdit($key,
            \URL::to('/dashboard/calendar/attributes', 'view')
        );
    }

    public function update($akID = null)
    {
        $this->edit($akID);
        $key = $this->getCategoryObject()->getController()->getByID($akID);
        $this->executeUpdate($key,
            \URL::to('/dashboard/calendar/attributes', 'view')
        );
    }

    public function select_type($type = null)
    {
        $type = Type::getByID($type);
        $this->renderAdd($type,
            \URL::to('/dashboard/calendar/attributes', 'view')
        );
    }

    public function add($type = null)
    {
        $this->select_type($type);
        $type = Type::getByID($type);
        $this->executeAdd($type, \URL::to('/dashboard/calendar/attributes', 'view'));
    }

    public function delete($akID = null)
    {
        $key = $this->getCategoryObject()->getController()->getByID($akID);
        $this->executeDelete($key,
            \URL::to('/dashboard/calendar/attributes', 'view')
        );
    }
}
By extending the core DashboardAttributesPageController we don't have to do much at all. We simply need to inform the page as to how to retrieve our various attribute keys, and what generic category object we're using. Since we have given our category the 'event' handle, that's what we use here.
The view layer is similarly simple. In packages/calendar/single_pages/dashboard/calendar/attributes.php we place these contents:
<?php defined('C5_EXECUTE') or die("Access Denied.");?>

<?php
$attributeView->render();
?>
That's it! The controller handles setting that view properly; it takes care of everything.
Adding Attribute Support to our custom Object
Now we need to add attribute support to our custom MyCal\Entity\Calendar\Event object. This is as simple as adding this line to our custom class:
use \Concrete\Core\Attribute\ObjectTrait;
and defining these methods which the object trait requires:
public function getObjectAttributeCategory();
public function getAttributeValueObject($ak, $createIfNotExists = false);
Here's how it might look in our custom entity. First, we'd import the relevant namespaces
use Core;
use Concrete\Package\Calendar\Entity\Attribute\Key\EventKey;
use Concrete\Package\Calendar\Entity\Attribute\Value\EventValue;

public function getObjectAttributeCategory()
{
    return \Core::make('\Concrete\Package\Calendar\Attribute\Category\EventCategory');
}

public function getAttributeValueObject($ak, $createIfNotExists = false)
{
    $category = $this->getObjectAttributeCategory();

    if (!is_object($ak)) {
        $ak = $category->getByHandle($ak);
    }

    $value = false;
    if (is_object($ak)) {
        $value = $category->getAttributeValue($ak, $this);
    }

    if ($value) {
        return $value;
    } elseif ($createIfNotExists) {
        $attributeValue = new EventValue();
        $attributeValue->setEvent($this);
        $attributeValue->setAttributeKey($ak);
        return $attributeValue;
    }
}
That's it! Now setAttribute() and getAttribute() will work on your custom event object.
Install the Package and Dashboard Pages.
Now it's time to actually install the attribute category and its Dashboard pages. The easiest way to do this with the Concrete content importer. From within your package's install() method, run this command:
public function install()
{
    $this->on_start();
    $this->installContentFile('content.xml');
}
Notice, we make sure to include the on_start() method in our install() method. It does not get run by default during installation, and we'll need to have those categories registered for everything to run smoothly. Also, make sure you have a content.xml file in the root of your package directory. Within it, describe the dashboard pages and attribute category in the CIF format:
<?xml version="1.0" encoding="UTF-8"?>
<concrete5-cif version="1.0">
    <attributecategories>
        <category handle="event" allow-sets="1" package="calendar"/>
    </attributecategories>
    <singlepages>
        <page name="Calendar" path="/dashboard/calendar"
              filename="/dashboard/calendar/view.php" pagetype=""
              user="admin" description="" package="calendar">
        </page>
        <page name="Attributes" path="/dashboard/calendar/attributes"
              filename="/dashboard/calendar/attributes.php" pagetype=""
              user="admin" description="" package="calendar">
        </page>
    </singlepages>
</concrete5-cif>
That's it. If you have any custom attribute keys or types to install along with this package, this is a perfect place to do it as well.
As long as the package has been configured to specify the entity locations properly, the database tables will automatically be created. More information on packages and Doctrine ORM can be found here..
Conclusion
Now you should have a fully functional attribute key category that is tied to your custom object, along with the dashboard interfaces to support it.
Advanced: Adding Extra Data to Attribute Category
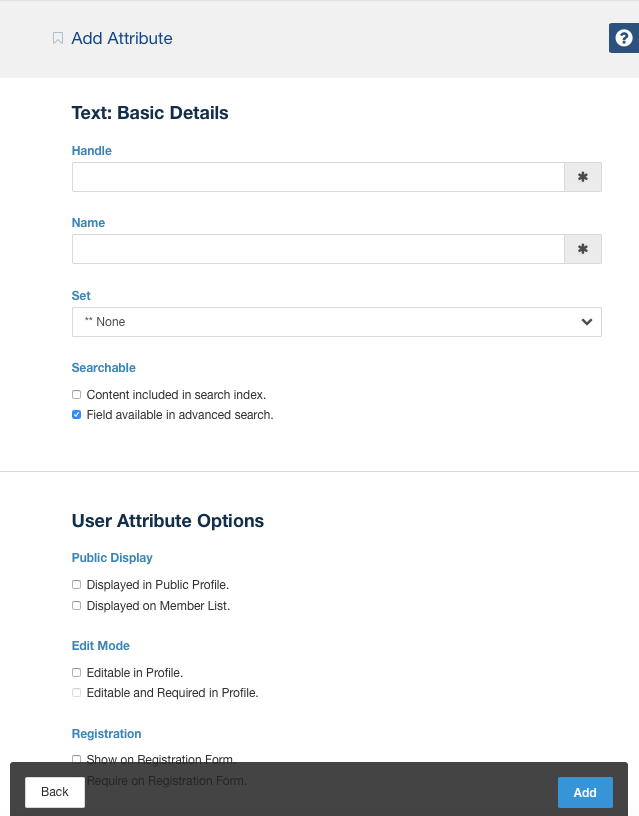
You can add additional parameters to a particular category of attribute keys. Just add these extra settings to the attribute key entity for the particular category, provide the additional fields in a custom element, and make sure to save the data in the attribute category key create/update requests. For example, Concrete's user attributes provide the following additional fields when creating user keys:
Ensure that the Key Entity has Extra Fields.
The Concrete\Core\Entity\Attribute\Key\UserKey field has extra fields for the storage of this extra data. Here's what they look like in the entity.
class UserKey extends Key
{
    /**
     * @ORM\Column(type="boolean")
     */
    protected $uakProfileDisplay = false;

    /**
     * @return mixed
     */
    public function isAttributeKeyDisplayedOnProfile()
    {
        return $this->uakProfileDisplay;
    }

    /**
     * @param mixed $uakProfileDisplay
     */
    public function setAttributeKeyDisplayedOnProfile($uakProfileDisplay)
    {
        $this->uakProfileDisplay = $uakProfileDisplay;
    }

    // Removed the rest of the class for brevity

}
Add a custom User Category Element
In concrete/elements/attribute/categories/user.php, an extra form displays these settings:
<?php
if (is_object($key)) {
    $uakProfileDisplay = $key->isAttributeKeyDisplayedOnProfile();
}
?>
<?php $form = Loader::helper('form'); ?>
<fieldset>
    <legend><?=t('User Attribute Options')?></legend>
    <div class="form-group">
    <label class="control-label"><?=t('Public Display')?></label>
        <div class="checkbox">
            <label class="checkbox"><?=$form->checkbox('uakProfileDisplay', 1, $uakProfileDisplay)?> <?=t('Displayed in Public Profile.');?></label>
        </div>
    </div>
</fieldset>
The $key object is an instance of Concrete\Core\Entity\Attribute\Key\UserKey. It may be null (if the attribute is being added). (Note: additional settings have been removed to make this easier to read.)
Save the Additional Settings
When creating or updating user keys, we need to save these additional settings. Fortunately, subclassing addFromRequest and updateFromRequest in the Concrete\Core\Attribute\Category\UserCategory object is all that we have to do. Here's how we do it:
/**
 * @param UserKey $key
 * @param Request $request
 *
 * @return Key
 */
protected function saveFromRequest(Key $key, Request $request)
{
    $key->setAttributeKeyDisplayedOnProfile((string) $request->request->get('uakProfileDisplay') == 1); // Other fields removed for readability
    return $key;
}

public function addFromRequest(Type $type, Request $request)
{
    $key = parent::addFromRequest($type, $request);
    return $this->saveFromRequest($key, $request);
}

public function updateFromRequest(Key $key, Request $request)
{
    $key = parent::updateFromRequest($key, $request);
    return $this->saveFromRequest($key, $request);
}
That's it! This is an example of a core category, but categories defined in packages work exactly the same way – just make sure to create your element at packages/your_package/elements/attribute/categories/your_category_handle.php.
Installing the Category Through PHP Code
The custom attribute key category is installed when running ContentImporter::importContentFile above, provided that this snippet exists within the content.xml file:
<?xml version="1.0" encoding="UTF-8"?>
<concrete5-cif version="1.0">
    <attributecategories>
        <category handle="event" allow-sets="1" package="calendar"/>
    </attributecategories>
</concrete5-cif>
However, if you wish to install this category through PHP, you can do so this way. First, import the Category facade into your package controller:
use Concrete\Core\Attribute\Key\Category;
Then, check to see if the category already exists, from within your install method:
$category = Category::getByHandle('event');
If the category doesn't exist, we'll create it:
if (!is_object($category)) {
    $category = Category::add('event', false, $pkg);
}
This will return an instance of Concrete\Core\Attribute\Category\CategoryInterface.