Now that we've created a custom attribute that extends a core attribute type, let's take this attribute further and add custom settings and data to it. Once you've mastered that, you'll be able to create any kind of attribute type.
The Property Location attribute from our previous example lets us choose a property location for a given page. Let's extend it so that it does a couple more things:
- When adding the attribute, we can choose whether to list the options as a select menu or as as series of radio buttons.
- When saving the attribute, let's choose whether we're going to allow a custom text label for the location saved. If so, we're going to use this text label when displaying the attribute (which we will worry about in a subsequent doc.)
These modifications will require a few changes to the attribute.
- We will have to modify the attribute controller so that it no longer inherits from the
Concrete\Attribute\Number\Controllerclass, since it no longer stores its data values inConcrete\Core\Entity\Attribute\Value\Value\NumberValueobjects (and will instead be providing its own data value objects.) - We will have to add the custom label to the PropCo\Property\Location object, since we'll need it in our custom object.
- We will have to add a new settings entity to store whether the attribute key created will output as a select list or as a list of radio buttons.
- We will have to add a new data value object that stores both the selected location ID and the custom label if it exists.
This might sound like a lot of work, but the Concrete CMS attribute system makes it so you can add these objects easily, and we even have to write any database queries to store the data.
Modify the Controller
First, change the controller to inherit from the default base attribute controller. This:
class Controller extends \Concrete\Attribute\Number\Controller
becomes this
use Concrete\Core\Attribute\Controller as AttributeController;
class Controller extends AttributeController
Then, let's add the search indexing for an integer into this attribute controller:
protected $searchIndexFieldDefinition = array('type' => 'integer', 'options' => array('default' => 0, 'notnull' => false));
(Don't worry about how this works yet, there's a separate doc for this.)
Modify the PropCo\Property\Location Object
Let's add a custom label property, getter, and let us set it through the constructor:
<?php
namespace PropCo\Property;
class Location
{

    protected $propertyLocationID;
    protected $customLabel;

    const LOCATION_CROWN_PLAZA = 1;
    const LOCATION_TOWN_SQUARE = 2;
    const LOCATION_HILL_ROAD = 3;
    const LOCATION_UPTOWN_AVENUE = 4;

    public function __construct($propertyLocationID, $customLabel)
    {
        $this->propertyLocationID = $propertyLocationID;
        $this->customLabel = $customLabel;
    }

    public function getLocationID()
    {
        return $this->propertyLocationID;
    }

    public function getCustomLabel()
    {
        return $this->customLabel;
    }

}
Creating a Settings Object and Type Form
First, let's create the form that will display when adding an attribute of this type. If you add type_form.php and a type_form() method to the controller, that method will be run every time an attribute of this type is added or updated, and the form will be rendered at the same time as well.
public function type_form()
{

}
We'll start out with an empty method. Then let's create this type_form.php template in application/attributes/property_location/type_form.php:
<fieldset>
    <legend><?=t('Location Settings')?></legend>

    <div class="form-group">
        <label class="control-label" for="formDisplayMethod">Form Display Method</label>
        <select class="form-control" name="formDisplayMethod">
            <option value="select">Select Menu</option>
            <option value="radio_list">Radio Button List</option>
        </select>
    </div>
 </fieldset>
That's it. Group your custom form into a fieldset and place it in the right place, and any type you create or update a Property Location attribute your settings will show up at the bottom:
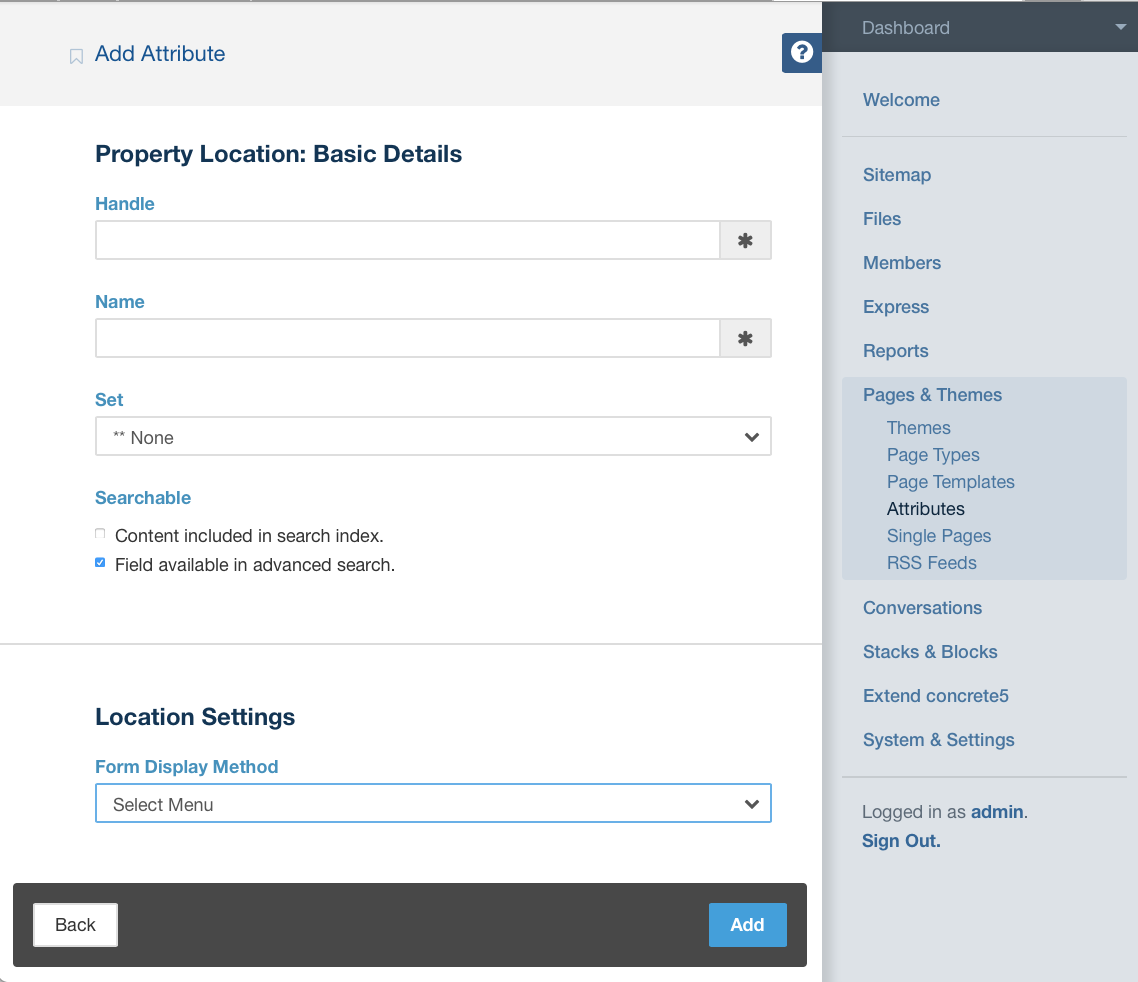
The 'formDisplayMethod' form value will be included in the post when the attribute key is created or updated. Now we need to create an object to store that value, and join the form to the entity in the controller.
Creating the Settings Entity
Next, let's create a settings entity class. This is a simple PHP class located in the proper place, with annotations on it to tell Doctrine ORM how to set up the entity in the database. Here is our class:
<?php
namespace Application\Entity\Attribute\Key\Settings;

use Concrete\Core\Entity\Attribute\Key\Settings\Settings;
use Doctrine\ORM\Mapping as ORM;

/**
 * @ORM\Entity
 * @ORM\Table(name="atPropertyLocationSettings")
 */
class PropertyLocationSettings extends Settings
{
    /**
     * @ORM\Column(type="string")
     */
    protected $formDisplayMethod = false;

    public function getAttributeTypeHandle()
    {
        return 'property_location';
    }

    /**
     * @return mixed
     */
    public function getFormDisplayMethod()
    {
        return $this->formDisplayMethod;
    }

    /**
     * @param mixed $formDisplayMethod
     */
    public function setFormDisplayMethod($formDisplayMethod)
    {
        $this->formDisplayMethod = $formDisplayMethod;
    }
}
This file should be placed in application/src/Entity/Attribute/Key/Settings/PropertyLocationSettings for autoloading to work properly.
Once this file is in place, go into Dashboard > System and Settings > Environment > Database Entities and click the "Refresh Entities" button. This will rescan all entity locations and create any database tables for entities that don't exist (including the atPropertyLocationSettings for this one.)
Now that we have the settings class in place, let's add the controller code that is responsible for taking our Type form's post and saving it into settings objects.
Saving the Data
Now, let's save the posted data into our settings object. First, import the settings class into our controller:
use Application\Entity\Attribute\Key\Settings\PropertyLocationSettings;
Then, create this method, which will tell our controller where to find our settings object:
public function getAttributeKeySettingsClass()
{
    return PropertyLocationSettings::class;
}
This method is used when creating new and retrieving existing settings objects for attribute keys.
Then, implement the saveKey($data) method; this method is called any time an attribute key is created or updated. $data is simply the POST values from the form.
public function saveKey($data)
{
    /**
     * @var $settings PropertyLocationSettings
     */
    $settings = $this->getAttributeKeySettings();

    $formDisplayMethod = 'select';
    if (isset($data['formDisplayMethod']) && $data['formDisplayMethod']) {
        $formDisplayMethod = $data['formDisplayMethod'];
    }

    $settings->setFormDisplayMethod($formDisplayMethod);

    return $settings;
}
Controller::getAttributeKeySettings takes care of either creating a new instance of the settings object, or retrieving the current attribute key's settings object. Next, we look for our formDisplayMethod value in the POST, and call the setter for this aspect of the Settings object. Then return the settings object at the end of the method.
That's it! The attribute system takes care of saving the object and making sure it's available everywhere.
Modifying the Type Form to use the Settings
Now that we're saving the settings properly, let's modify our Type Form so that when we edit attributes of this type, the proper settings are selected. type_form() becomes this:
public function type_form()
{
    $settings = $this->getAttributeKeySettings();
    /**
     * @var $settings PropertyLocationSettings
     */
    $this->set('formDisplayMethod', $settings->getFormDisplayMethod());
}
While type_form.php becomes this:
<fieldset>
    <legend><?= t('Location Settings') ?></legend>

    <div class="form-group">
        <label class="control-label" for="formDisplayMethod">Form Display Method</label>
        <select class="form-control" name="formDisplayMethod">
            <option value="select"
                    <?php if (isset($formDisplayMethod) && $formDisplayMethod == 'select') { ?>selected<?php } ?>>Select
                Menu
            </option>
            <option value="radio_list"
                    <?php if (isset($formDisplayMethod) && $formDisplayMethod == 'radio_list') { ?>selected<?php } ?>>
                Radio Button List
            </option>
        </select>
    </div>

</fieldset>
Simple and readable!
Modifying the Form to use Settings
Finally, it's time for us to actually use this setting to affect how the form renders. Modify form() so that the setting is injected:
public function form()
{
    if (is_object($this->attributeValue)) {
        $number = $this->attributeValue->getValueObject();
        if (is_object($number)) {
            $this->set('propertyLocationID', $number->getValue());
        }
    }
    $settings = $this->getAttributeKeySettings();
    /**
     * @var $settings PropertyLocationSettings
     */
    $this->set('formDisplayMethod', $settings->getFormDisplayMethod());
}
and let's modify form.php to change to using a radio button list if the settings support it:
<?php if (isset($formDisplayMethod) && $formDisplayMethod == 'radio_list') { ?>

    <div class="radio">
        <label><input <?php if (isset($propertyLocationID) && $propertyLocationID == 1) { ?>checked<?php }  ?> type="radio" name="<?=$view->field('value')?>" value="1"> Crown Plaza</label>
    </div>
    <div class="radio">
        <label><input <?php if (isset($propertyLocationID) && $propertyLocationID == 2) { ?>checked<?php }  ?> type="radio" name="<?=$view->field('value')?>" value="2"> Town Square</label>
    </div>
    <div class="radio">
        <label><input <?php if (isset($propertyLocationID) && $propertyLocationID == 3) { ?>checked<?php }  ?> type="radio" name="<?=$view->field('value')?>" value="3"> Hill Road</label>
    </div>
    <div class="radio">
        <label><input <?php if (isset($propertyLocationID) && $propertyLocationID == 4) { ?>checked<?php }  ?> type="radio" name="<?=$view->field('value')?>" value="4"> Uptown Avenue</label>
    </div>

<?php } else { ?>

    <select class="form-control" name="<?=$view->field('value')?>">
        <option value="">Select a Location</option>
        <option value="1" <?php if (isset($propertyLocationID) && $propertyLocationID == 1) { ?>selected<?php }  ?>>Crown Plaza</option>
        <option value="2" <?php if (isset($propertyLocationID) && $propertyLocationID == 2) { ?>selected<?php }  ?>>Town Square</option>
        <option value="3" <?php if (isset($propertyLocationID) && $propertyLocationID == 3) { ?>selected<?php }  ?>>Hill Road</option>
        <option value="4" <?php if (isset($propertyLocationID) && $propertyLocationID == 4) { ?>selected<?php }  ?>>Uptown Avenue</option>
    </select>

<?php } ?>
And that's it. We're checking the settings properly and modifying the form factor based on them.
Creating the Data Value Objects and the Custom Attribute Form
Creating the Data Value Entity
In order to start working with a custom data value object, we need to create a data value entity the same way we created a settings entity. We're going to store our property location ID in it (in an integer field) as well as a custom label. This new data value object will have no relation to the number value object, since adding this functionality effectively makes them completely unrelated.
First, create the entity object in application/src/Entity/Attribute/Value/Value/PropertyLocationValue.php.
<?php
namespace Application\Entity\Attribute\Value\Value;

use Concrete\Core\Entity\Attribute\Value\Value\AbstractValue;
use Doctrine\ORM\Mapping as ORM;

/**
 * @ORM\Entity
 * @ORM\Table(name="atPropertyLocation")
 */
class PropertyLocationValue extends AbstractValue
{
    /**
     * @ORM\Column(type="integer", nullable=true)
     */
    protected $propertyLocationID = 0;

    /**
     * @ORM\Column(type="string", nullable=true)
     */
    protected $customLabel = '';

    /**
     * @return mixed
     */
    public function getPropertyLocationID()
    {
        return $this->propertyLocationID;
    }

    /**
     * @param mixed $propertyLocationID
     */
    public function setPropertyLocationID($propertyLocationID)
    {
        $this->propertyLocationID = $propertyLocationID;
    }

    /**
     * @return mixed
     */
    public function getCustomLabel()
    {
        return $this->customLabel;
    }

    /**
     * @param mixed $customLabel
     */
    public function setCustomLabel($customLabel)
    {
        $this->customLabel = $customLabel;
    }


}
taking care to inherit from the Concrete\Core\Entity\Attribute\Value\Value\AbstractValue object (note: be careful not to inherit from the wrong AbstractValue class, as there is one at a namespace that is very similar to this one. Make sure it contains Value\Value twice prior to AbstractValue.
Next, refresh your entities in the Dashboard > System and Settings > Environment > Database Entities page as before, in order to automatically create the data value database table.
Modify the Controller to Pass the New Data
Now we're no longer using $value (which was a part of Concrete\Core\Entity\Attribute\Value\Value\NumberValue), we're using $propertyLocationID and $customLabel. So we need to make sure that our form() takes this data from our data value object and passes it into the for template.
Our form method used to look like this:
public function form()
{
    if (is_object($this->attributeValue)) {
        $number = $this->attributeValue->getValueObject();
        if (is_object($number)) {
            $this->set('propertyLocationID', $number->getValue());
        }
    }
    $settings = $this->getAttributeKeySettings();
    /**
     * @var $settings PropertyLocationSettings
     */
    $this->set('formDisplayMethod', $settings->getFormDisplayMethod());
}
We're passing $propertyLocationID in, but this won't work any longer, because getValue() actually doesn't return a number, since we're not using the number data value object any longer. Since we haven't overridden it in our Application\Entity\Attribute\Value\Value\PropertyLocationValue method (more on this later), it simply returns the PropertyLocationValue object. So let's change these lines to grab the proper, relevant data and set them into template.
public function form()
{
    if (is_object($this->attributeValue)) {
        $propertyLocationValue = $this->attributeValue->getValueObject();
        if (is_object($propertyLocationValue)) {
            $this->set('propertyLocationID', $propertyLocationValue->getPropertyLocationID());
            $this->set('customLabel', $propertyLocationValue->getCustomLabel());
        }
    }
    $settings = $this->getAttributeKeySettings();
    /**
     * @var $settings PropertyLocationSettings
     */
    $this->set('formDisplayMethod', $settings->getFormDisplayMethod());
}
Add The Custom Label Field to the Form
Now, we take our newly modified form and add our custom field to the bottom. We're going ot use this field to display the name of the location, if it's filled out for the attribute.
Additionally, make sure to change any $view->field('value') calls to $view->field('propertyLocationID'). Since we're not using the number controller to handle this, we are going to have to craft our own attribute value saving routine anyway, and 'propertyLocationID' makes more sense as a variable name for this purpose, since it matches the name of our custom data value object property. Additionally, make sure that the data that we have set in through the form() method is being printed out in the form controls themselves. When we've taken care of all of this, our form template looks like this:
<?php if (isset($formDisplayMethod) && $formDisplayMethod == 'radio_list') { ?>

    <div class="radio">
        <label><input <?php if (isset($propertyLocationID) && $propertyLocationID == 1) { ?>checked<?php }  ?> type="radio" name="<?=$view->field('propertyLocationID')?>" value="1"> Crown Plaza</label>
    </div>
    <div class="radio">
        <label><input <?php if (isset($propertyLocationID) && $propertyLocationID == 2) { ?>checked<?php }  ?> type="radio" name="<?=$view->field('propertyLocationID')?>" value="2"> Town Square</label>
    </div>
    <div class="radio">
        <label><input <?php if (isset($propertyLocationID) && $propertyLocationID == 3) { ?>checked<?php }  ?> type="radio" name="<?=$view->field('propertyLocationID')?>" value="3"> Hill Road</label>
    </div>
    <div class="radio">
        <label><input <?php if (isset($propertyLocationID) && $propertyLocationID == 4) { ?>checked<?php }  ?> type="radio" name="<?=$view->field('propertyLocationID')?>" value="4"> Uptown Avenue</label>
    </div>

<?php } else { ?>

    <select class="form-control" name="<?=$view->field('propertyLocationID')?>">
        <option value="">Select a Location</option>
        <option value="1" <?php if (isset($propertyLocationID) && $propertyLocationID == 1) { ?>selected<?php }  ?>>Crown Plaza</option>
        <option value="2" <?php if (isset($propertyLocationID) && $propertyLocationID == 2) { ?>selected<?php }  ?>>Town Square</option>
        <option value="3" <?php if (isset($propertyLocationID) && $propertyLocationID == 3) { ?>selected<?php }  ?>>Hill Road</option>
        <option value="4" <?php if (isset($propertyLocationID) && $propertyLocationID == 4) { ?>selected<?php }  ?>>Uptown Avenue</option>
    </select>

<?php } ?>

<div class="form-inline">
    <label><?=t('Custom Label')?></label>
    <input class="form-control" type="text" value="<?=$customLabel?>" name="<?=$view->field('customLabel')?>">
</div>
Update the Search Indexer
Next, let's update the getSearchIndexValue method that we have in our controller. Since we have the custom data value object, we're going to need to use that to return our ID, rather then the number data value object's getValue method.
public function getSearchIndexValue()
{
    if ($this->attributeValue) {
        /**
         * @var $value PropertyLocationValue
         */
        $value = $this->attributeValue->getValueObject();
        return $value->getPropertyLocationID();
    }
}
Handle Saving the Data
Finally, let's handle saving the data. We have to implement three methods in order to save attribute data:
createAttributeValueFromRequest()
createAttributeValue($mixed)
getAttributeValueClass()
createAttributeValueFromRequest is run when an attribute is saved through the standard user interfaces, like the sitemap attributes dialog, the attributes panel, the user attributes slideouts, etc... createAttributeValue is run whenever $object->setAttribute('my_property_location_attribute', $value) is run through code, with whatever you happen to pass through.
Both methods should return an instance of the Application\Entity\Attribute\Value\Value\PropertyLocationValue object, with the relevant POSTed data populated into the object. So here's how one might implement these methods.
Finally, the getAttributeValueClass method is used to determine the name of the entity used to store the attribute value. You can reuse this throughout your controllers, but its used by the getAttributeValueObject() method in the base controller to retrieve the relevant attribute data value object.
First, import the Application\Entity\Attribute\Value\Value\PropertyLocationValue class at the top of the controller namespace:
use Application\Entity\Attribute\Value\Value\PropertyLocationValue;
Then, add this code:
/**
 * @param $location Location
 * @return PropertyLocationValue
 */
public function createAttributeValue($location)
{
    $value = new PropertyLocationValue();
    $value->setPropertyLocationID($location->getLocationID());
    $value->setCustomLabel($location->getCustomLabel());
    return $value;
}

public function createAttributeValueFromRequest()
{
    $value = new PropertyLocationValue();
    $data = $this->post();
    $value->setPropertyLocationID($data['propertyLocationID']);
    $value->setCustomLabel($data['customLabel']);
    return $value;
}

public function getAttributeValueClass()
{
    return PropertyLocationValue::class;
}
The first method creates an attribute value based off of a passed Location object, so that in the future, this code will work
$location = new Location(1, 'My Location');
$page->setAttribute('location', $location);
The second creates the value from the request. And the third tells the attributes system which entity class to use to retrieve data value object settings from the Doctrine ORM entity manager.
Note
In createAttributeValueFromRequest, $this->post() is the only reliable way of getting attribute form values out of the request object. That's because attribute form values have additional data in them in order to ensure that multiple attribute key forms can coexist in a single form.
Change the getValue() method.
Finally, we have to change our controller's getValue() method, because it had been working with the number value, and it didn't know about our custom label. If we change it to this:
public function getValue()
{
    /**
     * @var $value PropertyLocationValue
     */
    $value = $this->attributeValue->getValueObject();
    if ($value) {
        return new Location($value->getPropertyLocationID(), $value->getCustomLabel());
    }
}
it will populate the PropCo\Property\Location object properly.
Conclusion
That's it. We've now added custom settings and a custom data object to our attribute. Calling getAttribute() on a page, user or file with our Property Location attribute will return one of our custom objects, and we're storing our custom label along with our ID. All without writing any database code.
This isn't necessarily the cleanest data model around – you could potentially do some work to avoid duplicating efforts between the PropCo\Property\Location object and the Application\Entity\Attribute\Value\Value\PropertyLocationValue object – but hopefully this will get your wheels turning and start you on writing your own attribute types with custom settings and value objects.