The most common way a developer will access the File Manager and File objects happens without them even knowing it. This is through the use of the File Manager Service, a series of methods on a PHP class that creates form elements. These form elements can be placed within forms and, when the form is submitted, will provide File object IDs to the backend code, enabling that code to store references to the File objects.
Example: Contact Information Block Template
Let's say we have a form template used in a Contact Information block. This block stores the first name and last name of a particular user. Here's what the template might look like.
<div class="form-group">
    <label class="control-label" for="first_name">First Name</label>
    <input class="form-control" name="first_name" value="<?php echo $first_name?>" />
 </div>
<div class="form-group">
    <label class="control-label" for="last_name">Last Name</label>
    <input class="form-control" name="last_name" value="<?php echo $last_name?>" />
 </div>
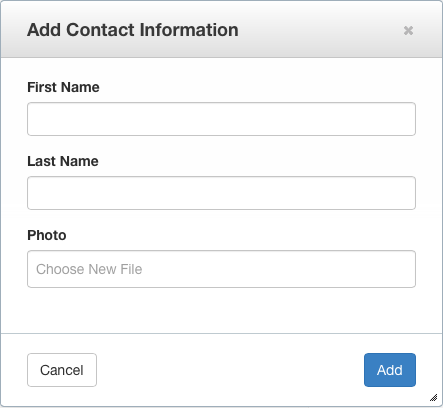
The form looks like this when rendered in the block.

but we want to add a photo as well. Rather than adding a URL, or rolling our own, we just add this to the HTML.
<div class="form-group">
    <label class="control-label">Photo</label>
    <?php
        $service = Core::make('helper/concrete/file_manager');
        print $service->file('photo', 'photoID', 'Select Photo');
    ?>
</div>
The parameters are pretty easy to understand. The first parameter, "photo" is simply the ID of the selector. It's typically not used but it is available if you'd like to set it. You should not use the same ID for multiple instances of the File Manager Service in a page or dialog window. The second parameter is the name of the hidden form element used to store the selected File object ID. The third parameter stores the text shown to the user within the form element. That's it. Now the block form looks like this:
Clicking on this form element will automatically launch the file manager, providing the user a searchable list of files. Full searching is available. Any file they click on will automatically be added to the selector, in a hidden input field with the name "photoID". That means that the block or single page controller processing this form submission will simply need to store the value of "photoID" from the request - it will be a numeric integer corresponding to the selected File ID.
Add photoID Field to Database
You'll need to add the photoID field to the database table of your block. This is done by adding the relevant XML to your block's db.xml file:
AXMLS (Most Common)
If your block's db.xml file begins with
<field name="photoID" type="I" size="10">
    <default value="0" />
    <unsigned/>
</field>
Doctrine XML (Used in 5.7.5 and Greater)
If your block's db.xml file begins with
<field name="photoID" type="integer">
  <unsigned/>
  <default value="0"/>
</field>
Finally, refresh the block type from the Dashboard > Stacks & Blocks > Block Types Dashboard page, in order to get the new photoID column to appear in the database. If your column matches and you don't have a custom save() routine in your Block controller, the file should save automatically. If you do have a custom save() routine, you can use this opportunity to ensure that you get an integer value into the proper column
public function save($args)
{
    $args['photoID'] = ($args['photoID'] != '') ? intval($args['photoID']) : 0;
    parent::save($args);
}
Supporting Edit Mode
We start this documentation with Retrieving file Objects Programmatically because we need to understand that in order to support edit mode for blocks that use files. When editing a block that uses the File Manager Service, we need to grab the currently selected file and send it into the instance of the Service. In our block above, the 'photoID' parameter is the one we're sending into the POST, and it's the name of our file column in the database, which means the numerical File ID for photoID will be automatically sent into our block's edit template. Here's how we pass that data into the File Manager Service if it exists.
<?php
    $photo = false;
    if ($photoID) {
        $photo = \File::getByID($photoID);
    }
?>
<div class="form-group">
    <label class="control-label">Photo</label>
    <?php
        $service = Core::make('helper/concrete/file_manager');
        print $service->file('photo', 'photoID', 'Select Photo', $photo);
    ?>
</div>
Simply pass the $photo File object into the file() method as the fourth argument, and it will automatically be prepopulated in the form.
Limiting By Type
In the above examples we use the file() method on the File Manager Service. This enables any file in the file manager to be chosen. We can limit files by type by using different methods
<?php
     // Only allow images to be chosen
    print $service->image('photo', 'photoID', 'Select Photo', $photo);
?>
Other methods for filtering the File Manager in this way can be found in the File Manager Service API Documentation
Enabling Multiple File Selection and Custom Functionality
The above example shows how easy it is to embed a File Manager selector form element in a form template. But what if you need to something more custom? For example, the Image Slider block doesn't use the File Manager Service to create an input element. Instead, it launches the File Manager and uses JavaScript to monitor the File Manager for Events that correspond to selected files. This way it can employ custom functionality when Files are selected. Here's how to launch the File Manager through JavaScript, and specify a custom callback function to run when a file is selected.
Basic Example
<a href="#" data-launch="file-manager">Select File</a>
<script type="text/javascript">
$(function() {
    $('a[data-launch=file-manager]').on('click', function(e) {
        e.preventDefault(); // Keeps page from scrolling up
        ConcreteFileManager.launchDialog(function (data) {
            alert(data.fID);
        });
    });
});
</script>
In this example, if the file with the ID of 3 is clicked, the File Manager will close, and the number 3 (the fID property of the file) will be alerted.
Retrieving Details about the Selected File
An additional method makes it easy to retrieve a JSON object populated with details about the selected file.
<a href="#" data-launch="file-manager">Select File</a>
<script type="text/javascript">
$(function() {
    $('a[data-launch=file-manager]').on('click', function(e) {
        e.preventDefault(); // Keeps page from scrolling up
        ConcreteFileManager.launchDialog(function (data) {
            ConcreteFileManager.getFileDetails(data.fID, function(r) {
                jQuery.fn.dialog.hideLoader();
                var file = r.files[0];
            });
        });
    });
});
</script>
The file object will contain a number of useful properties about the selected file.
Selecting Multiple Files
Selecting multiple files is similarly simple.
<a href="#" data-launch="file-manager">Select File</a>
<script type="text/javascript">
$(function() {
    $('a[data-launch=file-manager]').on('click', function(e) {
        e.preventDefault(); // Keeps page from scrolling up
        ConcreteFileManager.launchDialog(function (data) {
            console.log(data.fID); // With multiple selection this will ALWAYS be a JS array.
        }, {
            multipleSelection: true
        });
    });
});
</script>