Now that we've restructured our theme's SCSS, we need to move it into the actual theme directory, instead of keeping it in a separate build location. Why? Well, simply put as part of this we're going to be using the built-in SASS compiler that ships with Concrete. Since that's the case, we're going to need the files to be accessible to Concrete as it runs.
Move SCSS
First, copy the entire assets/scss directory into the application/themes/flintstone/css directory.
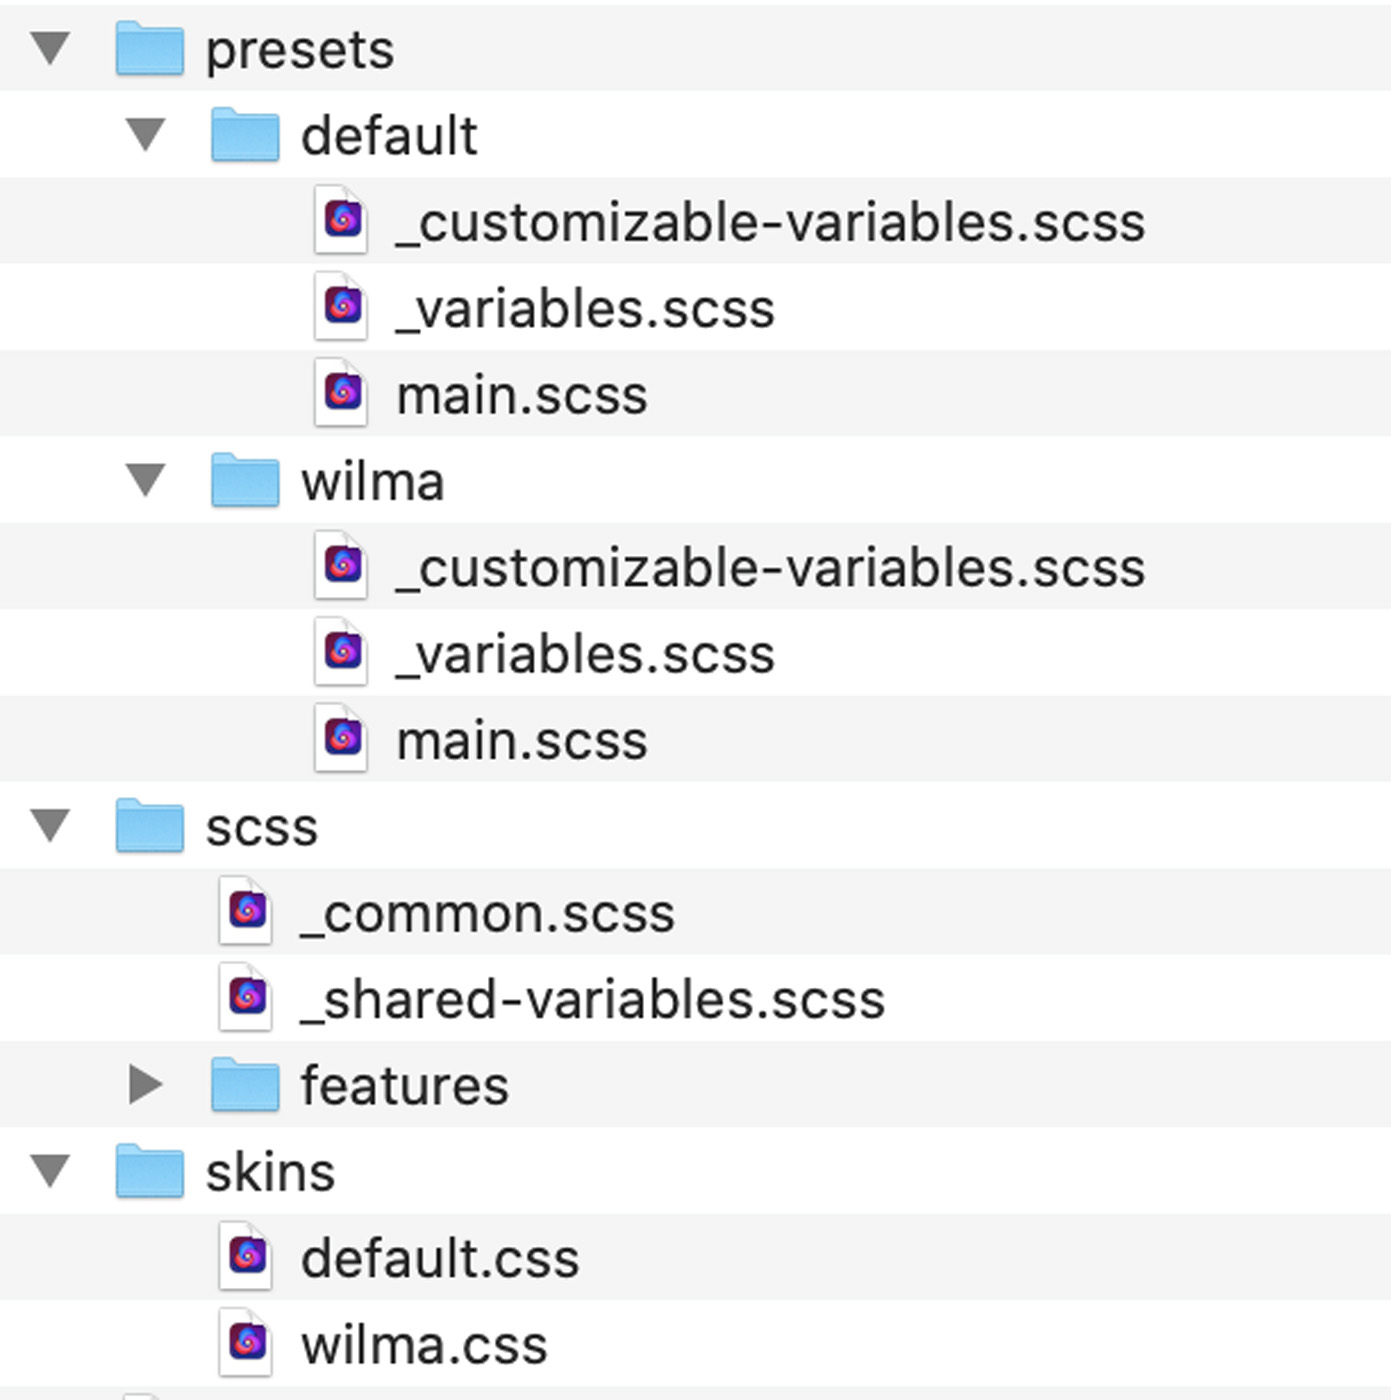
Next, rename the application/themes/flintstone/css/scss/skins directory to presets. Then, move the presets directory up one level, so it's directly inside css/.
Here's what the application/themes/flintstone/css directory looks like now:
Update main.scss Skin Entrypoints
Next, you'll need to change the inclusions in the main.scss files, because the _common.scss file that's imported within it is no longer at that path. You have to change:
@import "../../common";
to
@import "../../scss/common";
in both presets/default/main.scss and presets/wilma/main.scss.
Update All node_modules/ Inclusions
Next, make sure that you remove all tildes (~) that may be in your @import "~@concrete/" statements. You may be using these throughout your files. Make sure to remove them. For example, _common.scss should look like this:
@import "@concretecms/bedrock/assets/bedrock/scss/frontend";
and application/themes/flintstone/css/scss/features/_imagery.scss should look like this:
// Bedrock Lightbox
@import '@concretecms/bedrock/assets/imagery/scss/frontend/lightbox/lightbox';

// Bedrock Gallery
@import '@concretecms/bedrock/assets/imagery/scss/frontend/gallery/gallery';

// Bedrock Hero Image
@import '@concretecms/bedrock/assets/imagery/scss/frontend/hero-image';
Update webpack.mix.js
Now, you'll need to update webpack.mix.js. Since the shipping skins are still built by our Laravel Mix setup, we want to ensure that Laravel Mix still works, even though the customized version of the theme is powered by the separate SASS compiler that ships with Concrete.
Update the mix.sass(...) calls to reference the files at their new locations.
mix .sass('themes/flintstone/css/presets/default/main.scss', 'css/skins/default.css') .sass('themes/flintstone/css/presets/wilma/main.scss', 'css/skins/wilma.css') .js('assets/js/main.js', 'js/main.js');
Move Owl Carousel CSS Into the Theme Directory
Next, we need to move the Owl Carousel CSS we imported into our theme out of node_modules/ and directly into our theme. Why? Remember, node_modules/ isn't available within the Concrete environment. It's strictly used within the isolated theme build environment. So while it will work fine to build skins from, since the skin build process takes place within the isolated theme build environment, this will no longer work once the SCSS moves into the customizer, because the customizer works off of only those SCSS files that are available within the theme's directly.
But wait – how does Bedrock work?
If what you're saying is true, you might ask, how does this line still continue to work?
@import '@concretecms/bedrock/assets/imagery/scss/frontend/gallery/gallery';
It works because Bedrock and a subset of its functionality actually ships with Concrete CMS. You can see it in concrete/bedrock/assets. SCSS that imports Bedrock for the following items should work whether it's a custom theme build directory or within the customizer:
- Bedrock
- Font Awesome
- Bootstrap 5
- Fullcalendar
But for everything else, you'll need to move it into your theme if you want to make your theme customizable. So let's do that. These are the following problematic lines in our scss/features/_imagery.scss file:
// Owl Carousel
@import "~animate.css/animate.css";
@import "~owl.carousel/dist/assets/owl.carousel.css";
@import "~owl.carousel/dist/assets/owl.theme.default.css";
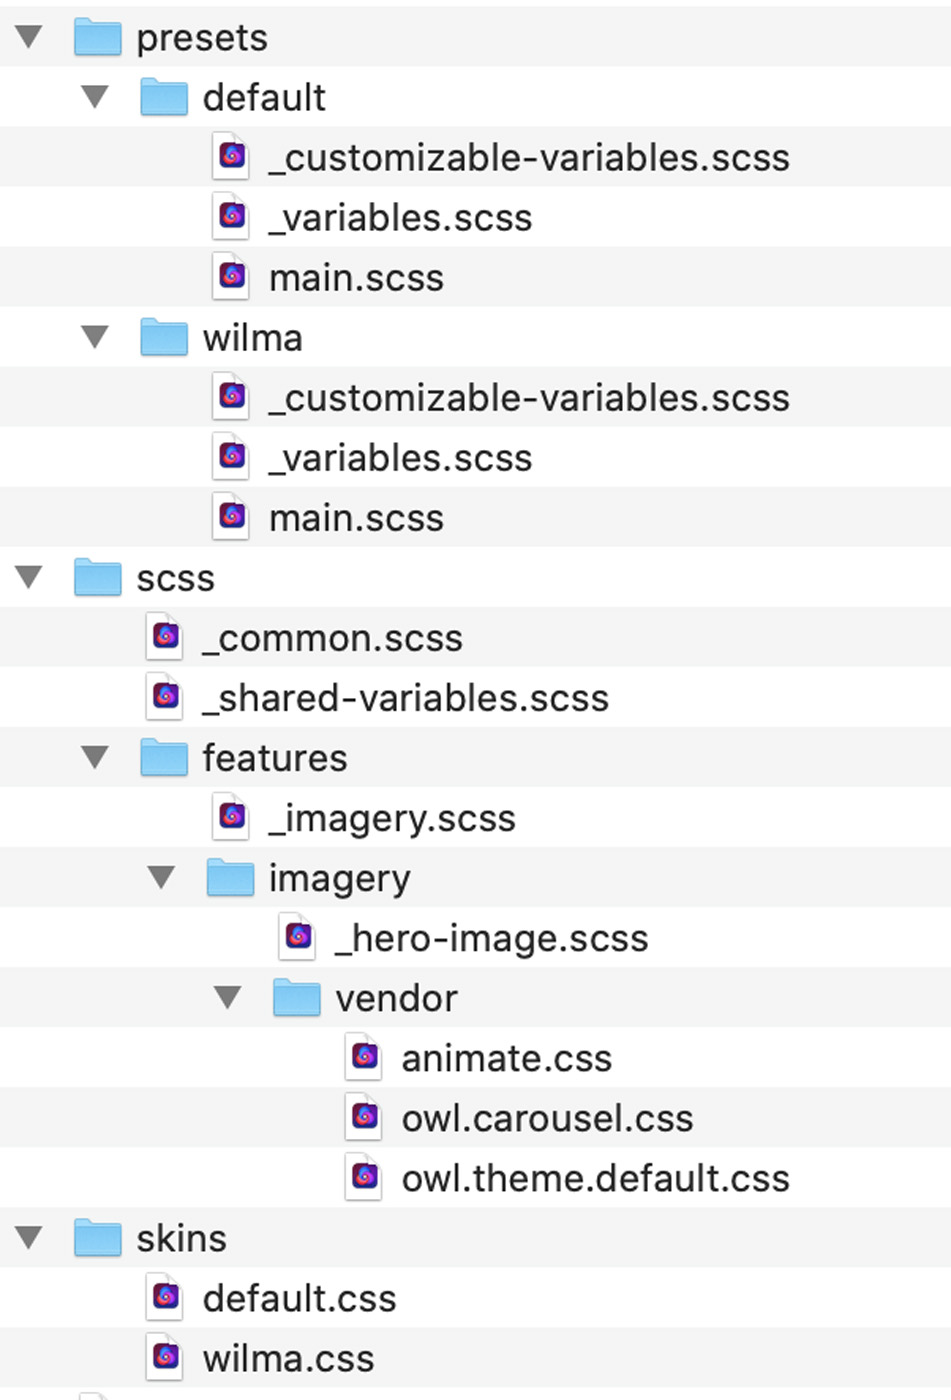
So let's make a directory named vendor/ within the features/imagery directory, and move animate.css, owl.carousel.css, and owl.theme.default.css into it. Now our application/themes/flintstone/css directory should look like this:
With that complete, let's change application/themes/flintstone/css/scss/features/_imager.css to import the files in the new vendor/ directory.
// Bedrock Lightbox
@import '@concretecms/bedrock/assets/imagery/scss/frontend/lightbox/lightbox';

// Bedrock Gallery
@import '@concretecms/bedrock/assets/imagery/scss/frontend/gallery/gallery';

// Bedrock Hero Image
@import '@concretecms/bedrock/assets/imagery/scss/frontend/hero-image';

// Owl Carousel
@import "imagery/vendor/animate";
@import "imagery/vendor/owl.carousel";
@import "imagery/vendor/owl.theme.default";

// Theme customizations
@import "imagery/hero-image";
Rebuild your assets with npm run production. When doing so, I actually received an error about a missing PNG file – owl.video.play.png – so I copied that file into vendor/ as well. Once that was complete, npm run production completed successfully.
Add !default To All Customizable Variable Definitions
We're almost ready to start customizing! The last thing we need to do before we start in on enabling customization is getting our _customizable-variables.scss files ready. In SASS, variables can be suffixed with ! default in order to allow them to be overridden by subsequent variable changes. This is also required in our customizer, otherwise the SASS compiler built into the core will be unable to pass its own custom values into the theme and override the defaults.
Open each _customizable-variables.scss file and add ! default to each variable. Here's what application/themes/flintstone/css/presets/default/_customizable-variables.scss looks like with this change:
$primary: #375d84 !default;
$secondary: #eb7724 !default;
$light: #fff !default;
$body-bg: #ffd89f !default;
$fun: #ec008c !default;
Ready to Customize
We're ready! Our skins have been turned into presets for the customizer, and our variables have been moved into the _customizable-variables.scss files that are required to launch the defaults for each preset. We can continue to build the skins themselves with npm while using the customizer within the site.