Interface Customization
Adding a Plugin to the Rich Text Editor
You can easily integrate a custom plugin into the rich text editor. Here's how you can register the 'clips' plugin and its associated JavaScript and CSS files:
<?php
namespace Concrete\Package\ClipsPlugin;

use Concrete\Core\Editor\Plugin;
use \Core;
use \AssetList;

class Controller extends \Concrete\Core\Package\Package
{
    protected $pkgHandle = 'clips_plugin';
    protected $appVersionRequired = '5.7.4RC1';
    protected $pkgVersion = '1.0';

    public function getPackageDescription()
    {
        return t("Integrates clips into the editor.");
    }

    public function getPackageName()
    {
        return t("Clips");
    }

    public function on_start()
    {
        $al = AssetList::getInstance();

        // Registering JS and CSS
        $al->register('javascript', 'editor/plugin/clips', 'js/redactor/clips.js', array(), 'clips_plugin');
        $al->register('css', 'editor/plugin/clips', 'css/redactor/clips.css', array(), 'clips_plugin');

        // Grouping assets
        $al->registerGroup('editor/plugin/clips', array(
            array('javascript', 'editor/plugin/clips'),
            array('css', 'editor/plugin/clips')
        ));

        // Setting up the plugin
        $plugin = new Plugin();
        $plugin->setKey('clips');
        $plugin->setName('Clips');
        $plugin->requireAsset('editor/plugin/clips');

        // Registering the plugin
        Core::make('editor')->getPluginManager()->register($plugin);
    }
}
After installing this package, you can configure the 'clips' plugin via the editor's settings page in the dashboard.
Using the Rich Text Editor
Easily integrate the custom rich text editor into custom blocks, single pages, or page templates. Here's how:
If you have this form:
<div class="form-group">
    <label class="control-label">Notes</label>
    <textarea name="notes" class="form-control"><?php echo $notes?></textarea>
</div>
Replace it with:
<div class="form-group">
    <label class="control-label">Notes</label>
    <?php
    $editor = Core::make('editor');
    echo $editor->outputStandardEditor('notes', $notes);
    ?>
</div>
Core::make('editor') provides the editor object. outputStandardEditor() needs the name of the form element and any content for the text area. Use outputBlockEditModeEditor() for editor custom styles, and outputStandardEditor() otherwise.
Controller Setup
Use the LinkAbstractor class for handling Concrete URLs:
use Concrete\Core\Editor\LinkAbstractor;
In block controllers, use the LinkAbstractor methods in edit(), view(), and save():
public function edit()
{
    $this->set('notes', LinkAbstractor::translateFrom($this->notes));
}

public function view()
{
    $this->set('notes', LinkAbstractor::translateFrom($this->notes));
}

public function save($args)
{
    $args['notes'] = LinkAbstractor::translateTo($args['notes']);
    parent::save($args);
}
For single page controllers, only view() is available.
Customizing the Editor
The default outputStandardEditor() and outputBlockEditModeEditor() give access to the file manager and sitemap. To customize:
To disable file manager and sitemap:
$editor = Core::make('editor');
$editor->setAllowFileManager(false);
$editor->setAllowSitemap(false);
echo $editor->outputStandardEditor('notes', $notes);
To include/exclude editor plugins:
$editor = Core::make('editor');
$editor->getPluginManager()->deselect(['table', 'underline', 'specialcharacters']);
$editor->getPluginManager()->select('fontsize');
echo $editor->outputStandardEditor('notes', $notes);
Implementing Guides on Dashboard Pages
To incorporate guides to your dashboard page, you can easily leverage the in-built help registry. For adding a "Launch Guide" button to your acme_widgets Dashboard page, follow these steps:
- Modify this existing line:
$this->app['help/dashboard']->registerMessageString('/dashboard/acme_widgets/add', t('Add a Widget.'));
To:
$this->app['help/dashboard']->registerMessageString('/dashboard/acme_widgets/add',
    array(t('Add a Widget.'), 'add-widget')
);
With this change, a Help button will appear:

Clicking it, initially, will show a JavaScript error because we're yet to handle the guide through JavaScript.
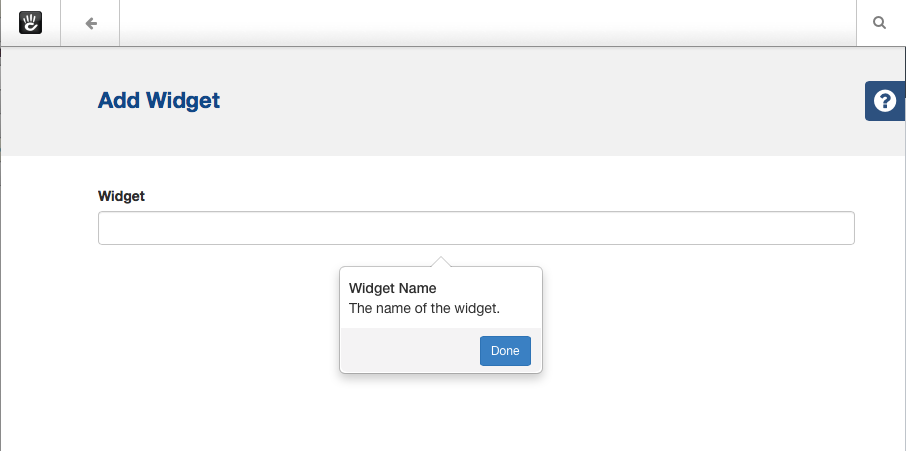
- Add the following script to your Dashboard page's view template:
<script type="text/javascript">
    $(function () {
        var steps = [{
            content: '<p><span class="h5"><?=t('Widget Name')?></span><br/><?=t('The name of the widget.')?></p>',
            highlightTarget: false,
            nextButton: true,
            target: $('input[name=widgetName]'),
            my: 'top center',
            at: 'bottom center'
        }];

        var tour = new Tourist.Tour({
            steps: steps,
            tipClass: 'Bootstrap',
            tipOptions:{
                showEffect: 'slidein'
            }
        });
        tour.on('start', function() {
            ConcreteHelpLauncher.close();
        });
        ConcreteHelpGuideManager.register('add-widget', tour);
    });
</script>
The above script initializes a tour guide when the button is clicked.
For further customization and options, refer to Tourist documentation. This library, embedded in the system, enables attractive and flexible guides, offering significant control for developers familiar with JavaScript.
Customizing Help Message Display
To gain more control over the help message's appearance and functionality, instead of the standard registerMessageString(), you can directly input a message object.
Instead of:
public function register()
{
    $this->app['help/dashboard']->registerMessageString('/dashboard/acme_widgets/add', t('Add a Widget.'));
}
Use:
public function register()
{
    $message = new \Concrete\Core\Application\Service\UserInterface\Help\Message();
    $message->addGuide('add-calendar');
    $message->setMessageContent(t('Add a widget.'));
    $this->app['help/dashboard']->setMessage('/dashboard/acme_widgets/add', $message);
}
This achieves the same result. However, for more advanced customizations, you can use your custom class. For example, suppose you have a custom help message with new display formatting options or additional features. It could be located at \Concrete\Package\AcmeWidgets\Help\Message(). Let's imagine it offers a new method called setCrossLinkedSection().
public function register()
{
    $message = new \Concrete\Package\AcmeWidgets\Help\Message();
    $message->setMessageContent(t('Add a widget.'));
    $message->setCrossLinkedSection('/dashboard/acme_widgets/list');
    $this->app['help/dashboard']->setMessage('/dashboard/acme_widgets/add', $message);
}
Ensure your object passed to setMessage() implements the \Concrete\Core\Application\Service\UserInterface\Help\Message\MessageInterface interface. This ensures compatibility with basic functionalities.
Your custom message class might look like:
<?php
namespace Concrete\Package\AcmeWidgets\Help;

class Message implements MessageInterface
{
    protected $content;
    protected $crosslink;
    protected $identifier;

    public function getContent()
    {
        $content = new \HtmlObject\Element('div');
        $content->setChild(new \HtmlObject\Element('p', $this->content));
        if ($this->crosslink) {
            $linkedPage = \Page::getByPath($this->crosslink, 'ACTIVE');
            $content->setChild(id(new \HtmlObject\Link($this->link, $linkedPage->getCollectionName()))->target('blank'));
        }
        return $content;
    }

    public function setMessageContent($content)
    {
        $this->content = $content;
    }

    public function getIdentifier()
    {
        return $this->identifier;
    }

    public function setIdentifier($identifier)
    {
        $this->identifier = $identifier;
    }

    public function setCrossLinkedSection($crosslink)
    {
        $this->crosslink = $crosslink;
    }
}
With this custom class, while you add new functionalities, you ensure that Concrete recognizes and handles it correctly thanks to the MessageInterface implementation.