Advanced Block Concepts
Directory Structure
One of the nicest aspects of Concrete CMS's block type system is its relative simplicity: every block type is bundled into its own directory, whose contents is pretty easy to understand. For a basic example, let's check out the Content block, which editors use when they want to add rich text by interactive with an in-page WYSIWYG editor. This block is located at concrete/blocks/content:
add.php
Optional. This file is rendered every time an editor adds the block into the page. Since this block is set up to enable in-page editing, this add.php file is actually injected into the page's DOM structure. If this file isn't present, the block won't present a form when it's added – it will just be saved and added directly into the page. This is useful for blocks that don't have any options.
composer.php
Optional. This is the custom editing template used by this block when it is included in a Page Type's Compose form.
controller.php
Required. This file is responsible for defining core properties of the block type, like its name and handle. This file can also contain methods that automatically get run by the block when its different states are rendered.
db.xml
Optional. This file contains an XML representation of the block's database tables. If the block doesn't have a database table this won't be used. The structure of this file is in the Doctrine XML format.
edit.php
Optional. This file is rendered every time an editor edits the block. In the case of the content block, this form will be injected directly into the page's DOM. If this file isn't present, the block won't be editable through the CMS.
icon.png
Required. This image is the icon representation of the block type when it's presented in the sidebar to site editors. The dimensions of this icon should be a square – and they should be at least 50x50.
scrapbook.php
Optional. This file is rendered any time this block is present in the clipboard panel. If this file isn't present the regular view template will be rendered. This can be useful when the view file conflicts in some way with the clipboard container.
view.php
Required. This file is rendered any time the block is displayed in the page.
Overrides
As with many things in Concrete, the files in a block type's directory can be overridden. To override a block type template file:
- Turn off the Overrides Cache from Dashboard > System & Settings > Optimization > Cache & Speed Settings.
- Copy the file you wish to override from the concrete/blocks/ directory into a directory exactly matching it in the empty application/blocks directory.
This should be all you need to do, with one exception:
Overriding controller.php
If you're overriding controller.php, you'll need to change the namespace of the controller.php, and it should extend the original block type controller. For example, if you're overriding the Content block controller:
- Create a file at application/blocks/content/controller.php
- Within this file, make sure the namespace of the file is \Application\Block\Content.
Make the class in the file extend the Content block controller:
class Controller extends \Concrete\Block\Content\Controller
{
   // .. your customizations
}
Overriding block templates is one of the things a Concrete developer does frequently. Any time a developer has existing HTML that they want to adapt to a Concrete block, it can often be easier to override that block's view template to match the existing HTML structure rather than rework CSS and the HTML to match Concrete's output. Read on to see how:
Design Guidelines
Add & Edit Dialogs
Concrete uses the Bootstrap 5 toolkit for its edit interface. The ccm-ui class is prefixed for Bootstrap, but block developers don't need to manually include it. While Bootstrap offers neat forms, it's not mandatory. See the Hello World Block for basic styling.
Inline Blocks
For blocks with their own toolbars, use ccm-inline-toolbar on a UL element. This makes the toolbar stick to the browser's top.
View Layers
Styling a block's view.php is straightforward: no special steps needed! A good practice is using classes starting with ccm-block followed by the block's handle, e.g., ccm-block-page-list-title. This isn't obligatory.
Implementing AJAX in Block View Templates
Using AJAX in block view templates with Concrete CMS allows dynamic updates, such as refreshing articles or adding likes without page reloads.
Block View
Consider the "Likes This" block. The block view checks if a user has liked the page and displays the appropriate content:
<div class="ccm-block-likes-this-wrapper">
    <?php if ($userLikesThis) { ?>
        <i class="fa fa-thumbs-up"></i> <?=t('You Liked.')?>
    <?php } else { ?>
        <a rel="nofollow" href="<?php echo $view->action('like', Core::make('token')->generate('like_page'))?>" data-action="block-like-page"><i class="fa fa-heart"></i> <?=t('Like')?></a>
    <?php } ?>
</div>
The action method in the BlockView instance generates a URL that will trigger the "like" method:
<a href="<?php echo $view->action('like', Core::make('token')->generate('like_page'))?>" data-action="block-like-page"><?=t('Like')?></a>
JavaScript (view.js)
JavaScript attaches an AJAX handler to every link with the block-like-page data attribute:
$(function() {
    $('a[data-action=block-like-page]').on('click', function() {
        jQuery.ajax({
            url: $(this).attr('href'),
            dataType: 'html',
            type: 'post',
            success: function(response) {
                $('div.ccm-block-likes-this-wrapper').replaceWith(response);
            }
        });
        return false;
    });
});
URL Structure
An example URL is:
https://example.com/path/to/page/like/1449092546%3Acd36b79545b999eec596e1f403477b2e/2279/
It includes the "like" method, a CSRF token for security, and the block ID (2279) to identify the block being interacted with.
Controller
The block controller processes the server-side logic:
public function action_like($token = false, $bID = false) {
    if ($this->bID != $bID) return false;
    if (Core::make('token')->validate('like_page', $token)) {
        $page = Page::getCurrentPage();
        $u = new User();
        $this->markLike($page->getCollectionID(), $u->getUserID());
        if ($_SERVER['HTTP_X_REQUESTED_WITH'] == 'XMLHttpRequest') {
            $b = $this->getBlockObject();
            $bv = new BlockView($b);
            $bv->render('view');
        } else {
            Redirect::page($page)->send();
        }
    }
    exit;
}
This checks the block ID, validates the token, and, based on the request type, re-renders the block or redirects.
Making Blocks Cacheable for Better Performance
Without caching, any time a block view is rendered in a page, the following takes place:
- The block ID, area name and page ID is retrieved from the Database.
- Using this data, the information from the block's
$btTableis retrieved dynamically. - The
view()method from the block's controller is run. - The
view.phpor custom template PHP file for that block instance is rendered.
Some blocks require this level of dynamic processing, but many don't. For those, it doesn't make sense to run through all these steps every time the block is rendered, on every page. Instead, block's can be made cacheable, in various levels. Caching improves performance by reducing the time it takes for the server to render the page, and is increasingly important the more blocks that are placed on a page.
To make a block cacheable, simply add any of the following protected class variables to your block's controller.
Variables
$btCacheBlockRecord
This defaults to true, meaning that it is enabled for block types by default. When this is set to true, step 2 in the list above is not necessary. Instead, the $btTable record data will be stored with the block record in step 1, and will automatically be cached and retrieved. This can almost always be set to true.
$btCacheBlockOutput
Defaults to false. When block caching is enabled, enabling this boolean means that the output of the block will be saved and delivered without running steps 3 and 4 above. This means view() will not run.
$btCacheBlockOutputLifetime
Defaults to no time limit (0). When block caching is enabled and output caching is enabled for a block, this is the value in seconds that the cache will last before being refreshed.
$btCacheBlockOutputOnPost
Defaults to false. This determines whether a block will cache its output on POST. Some blocks can cache their output but must serve uncached output on POST in order to show error messages, etc…
$btCacheBlockOutputForRegisteredUsers
Defaults to false. Determines whether a block that can cache its output will continue to cache its output even if the current user viewing it is logged in.
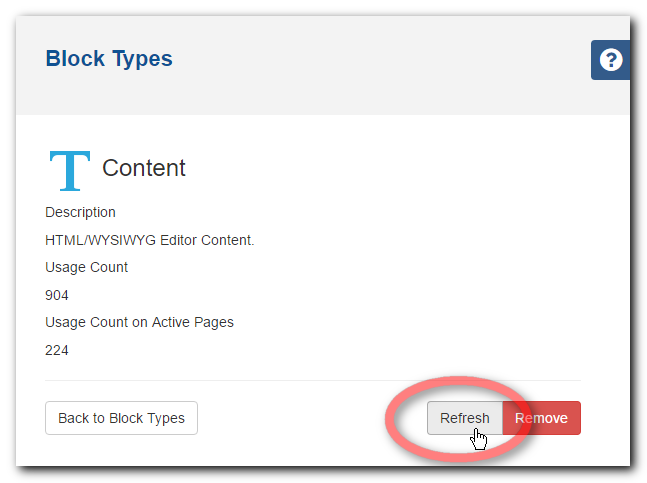
Refreshing a block
When changing any of these parameters in your block type, make sure to refresh your block type via Dashboard > Stacks & Blocks > Block Types. Click on the block type in the list and click refresh. Otherwise the block type record won't be aware that its cache settings have changed.
Overriding cache settings
The PHP variables above define the default caching settings for that block type, however you can override the caching rules for a specific instance of a block within Edit Mode.
In Edit Mode, select the block you need to edit and choose "Advanced".

Select "Override block type cache settings"

Apply any overrides to the default caching settings. This will apply only to that specific instance of the block.
Enabling Composer Editing for a Block Type
Any block type can be included in Concrete CMS's Page Type composer interface.
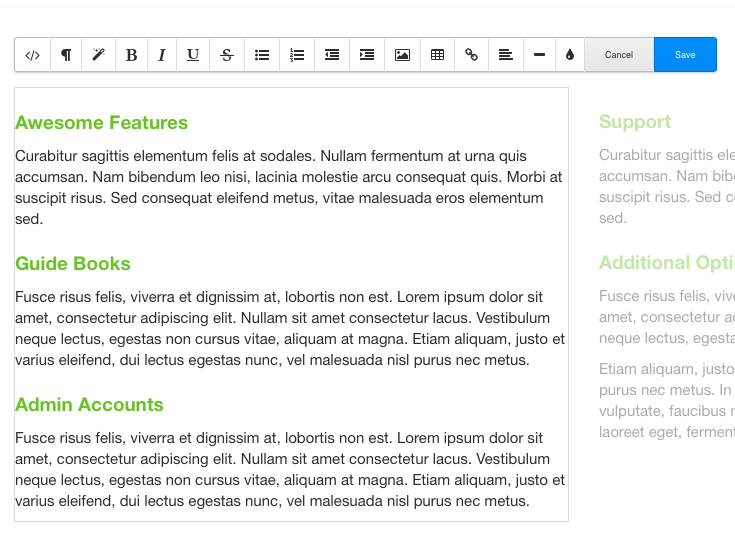
Block Appearing in the Page Type Edit Interface
HTML Block as It Appears in Composer
Composer Template File
Since composer view for a page is the same for adding a page and editing a page, there aren't separate add and edit templates. There's just one: composer.php. In order for your block type to be listed in the Block "Add Control" interface on the Page Type edit screen, a file named "composer.php" must be present in the block's directory.
touch application/blocks/your_block/composer.php
Composer template scope items
These are variables found in the composer.php template automatically that will be useful.
$label
This is a text representation of the composer control label. This label can be customized through the page type interface.
$description
This is the help description specified for this particular composer control. This description can be specified through the page type edit interface.
$view
This is an instance of the Concrete\Core\Block\View\BlockView class. The field() method on this class is how the composer templates output their form names.
Example
Here is the HTML block composer template:
<div class="control-group">
    <label class="control-label"><?=$label?></label>
    <?php if($description): ?>
    <i class="fa fa-question-circle launch-tooltip" title="" data-original-title="<?=$description?>"></i>
    <?php endif; ?>
    <div class="controls">
        <?php
        print $form->textarea($view->field('content'), $content, array(
            'class' => $class,
            'style' => 'width: 580px; height: 380px'
        ));
        ?>
    </div>
</div>
Let's walk through the template. First, we notice the style of markup. This is done using Bootstrap 3. The $label parameter is either going to be "HTML" or the custom label set through Composer. Additionally, we use the Bootstrap tooltip library to provide access to the help text, if a user provided it through the interface. The composer template itself is responsible for rendering labels and help text, because we wanted to give developers maximum flexibility for how they displayed that information (or chose not to.)
Next, we see the only form element that the HTML block uses, the text area. This is very similar to the edit interface for the HTML block, with one very important difference. Instead of using "content" as the name of the text area input element, we make the name of the text area input element $view->field('content'). This transforms "content" into something like that looks like this ptComposer[36][content]. We do this because multiple blocks with the same parameters can exist in one composer form, so we can't just name our composer elements indiscriminately. Instead, we use $view->field('content') which takes care of ensuring our "content" parameter will be unique to this composer control instance, and automatically translates it back to "content" when saving the form. Note: $view->field() works in regular block edit and add templates as well, so it's a good idea to use it, rather than just hard-coding "content".
That's it! With this simple template we've added composer functionality to our block.
Disabling in Edit Mode & Clipboard View
While most blocks can coexist with Concrete CMS's editing environment without issue, it can be useful to display a different view layer for a block while a page is in edit mode. Perhaps your block employs some custom CSS that places its z-index higher than Concrete's edit layer, or it uses Flash or other technologies that don't always work well with our overlay. Maybe its JavaScript and Concrete's JavaScript conflict. In these cases, it's useful to disable your block's view in edit mode. Here's how the YouTube block does it.
<?php
$c = Page::getCurrentPage();
if ($c->isEditMode()) { ?>

    <div class="ccm-edit-mode-disabled-item" style="width: <?= $vWidth; ?>px; height: <?= $vHeight; ?>px;">
        <div style="padding:8px 0px; padding-top: <?= round($vHeight/2)-10; ?>px;"><?= t('YouTube Video disabled in edit mode.'); ?></div>
    </div>

<?php } else { ?>

<!--youtube contents here//-->

<?php } ?>
This is pretty self-explanatory. We use the current page object, and then we display disabled content within the "ccm-edit-mode-disabled-item."
Clipboard
The "Add from Clipboard" view from the Add Panel attempts to render the view layer of each block that appears within it, and this can also lead to problems. For example, if a block has a problem displaying its contents with multiple instances on a page, this could be a problem. To fix this, simply include a file named "scrapbook" in your block's folder. This file will be used when the block is rendered in the Add Panel, as opposed to the view.php file.
Example
The HTML block is an excellent example of using a custom clipboard template. Since anything can be in the HTML block, and this could lead to problems, we sanitize the view when the HTML block is rendered in the clipboard. From concrete/blocks/html/scrapbook.php:
<?php defined('C5_EXECUTE') or die('Access Denied.'); ?>

<div id="HTMLBlock<?=intval($bID)?>" class="HTMLBlock" style="max-height:300px; overflow:auto">
<?php echo Concrete\Block\Html\Controller::xml_highlight(($content)); ?>
</div>
The contents are highlighted nicely, and are guaranteed to not impact any other blocks rendered in the panel at the same time.
Enabling Search Indexability
Any time a user uses the Concrete search block or the Dashboard Page Search to search pages, that query uses the PageSearchIndex database table. This table is also queried every time a developer uses \Concrete\Core\Page\PageList::filterByKeywords. It's easy to enable your block's to add their content to the page search index; simply add a method named getSearchableContent() to your block's controller file. For example, here's how the Feature block implements this method:
public function getSearchableContent()
{
    return $this->title . ' ' . $this->paragraph;
}
Registering and Requiring CSS & JavaScript
In Concrete, assets simplify the grouping of related CSS and JavaScript files, ensuring they're loaded on the right pages in the correct order. The system supports asset versioning, minification, and combination.
To register an asset for a custom block, follow these steps:
1. Ensure the library is in your block's directory (e.g., by placing it in application/blocks/audio_player/).
2. Register the JavaScript and CSS files for the library in your block controller's on_start() method.
public function on_start()
{
    $al = \Concrete\Core\Asset\AssetList::getInstance();
    $al->register(
        'javascript', 'mediaelement', 'blocks/audio/mediaelement/mediaelement-and-player.min.js',
        array('version' => '2.16.3', 'minify' => false, 'combine' => true)
    );
    $al->register(
        'css', 'mediaelement', 'blocks/audio/mediaelement/mediaelementplayer.min.css',
        array('version' => '2.16.3', 'minify' => false, 'combine' => true)
    );
}
Next, we group the asset into a single asset group.
$al->registerGroup('mediaelement', array(
    array('css', 'mediaelement'),
    array('javascript', 'jquery'),
    array('javascript', 'mediaelement')
));
Finally, we require the asset from within a registerViewAssets() method in our block controller:
public function registerViewAssets($outputContent = '')
{
    $this->requireAsset('mediaelement');
}
Grouping Block Types into Sets
Each Block Type can appear in a set, which will group it with similar block types in the add block user interface.
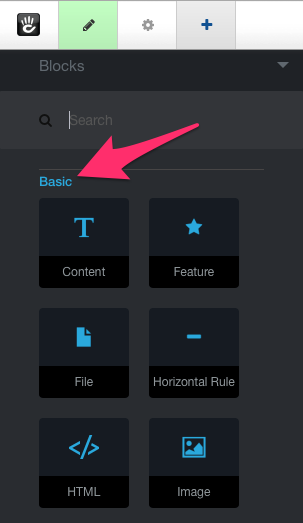
The following sets are available by default.
- Basics
- Navigation
- Forms
- Social Networking
- Multimedia
To make sure your block type appears in the right set, just add this protected variable to its controller class
protected $btDefaultSet = 'your_set';
Where your_set is one of the following (to correspond with the list above):
- basic
- navigation
- form
- social
- multimedia
To create additional block sets, for example in a package, you can use:
use BlockTypeSet;
if (!BlockTypeSet::getByHandle('handle')) {
    BlockTypeSet::add('handle', 'Name', $pkg);
}
Note that if you previously installed your block type without a set, you'll have to remove it and reinstall it for the new set to take effect.
Enabling Inline Editing
By default, block editing UX is rendered in a dialog box. However, you can configure your blocks to inject their add and edit interfaces directly into the page:
Marking your block as capable of inline editing is as easy as adding the following parameters to your block type's controller.php class.
protected $btSupportsInlineEdit = true;
protected $btSupportsInlineAdd = true;
Note: once your block is available for inline editing, you'll need to provide your own code to save your block and to generate an inline toolbar, if you'd like it to match the built-in styles of the Concrete inline editor. Here is some example code for a simple inline toolbar as used by the very handy (slightly adapted) Editor Comment block:
<ul class="ccm-inline-toolbar">
    <li class="ccm-inline-toolbar-button ccm-inline-toolbar-button-cancel">
        <button class="btn btn-default"><?php  echo t('Cancel'); ?></button>
    </li>
    <li style="cursor:help;">
        <span class="fa fa-question-circle">
        </span>
    </li>
    <li class="ccm-inline-toolbar-button ccm-inline-toolbar-button-save">
        <button class="btn btn-primary"><?php  echo t('Save'); ?></button>
    </li>
</ul>
Next, you'll need to ensure that the buttons fire the proper Concrete JavaScript events. These take of saving blocks in inline edit mode. Your cancel button should call this method:
ConcreteEvent.fire('EditModeExitInline');
To save your block, you'll need to wire this JavaScript method to your save button:
ConcreteEvent.fire('EditModeBlockSaveInline');
Disabling Grid Container
In Concrete CMS, themes offer a grid layout, allowing site editors to structure pages into responsive columns. This grid can auto-wrap blocks, yet some blocks can stretch to full page width. See this image:
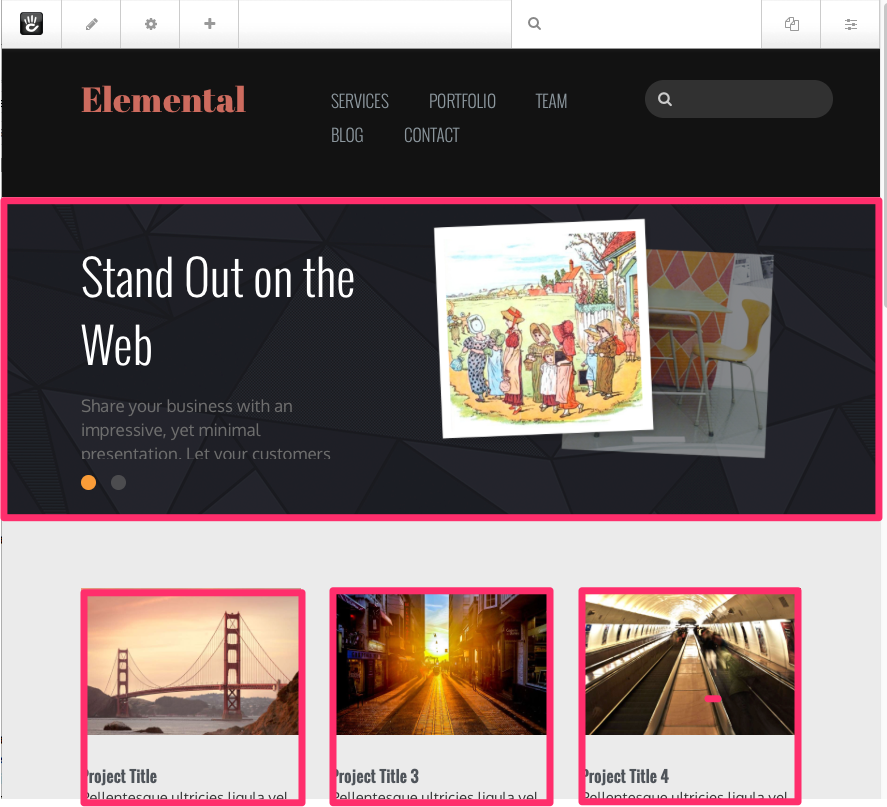
The bottom three images are in a three column layout. Notice how they're set in from the edge of the page? They are centered within the browser. The top image, however, is part of the image slider block, which disables the grid container, so it can extend the entire width of the page. Disabling the grid container is something that's easy to do at the block type level. Simply add this line of code to your block's controller.php class:
protected $btIgnorePageThemeGridFrameworkContainer = true;
Working with Multiple Database Tables
Concrete CMS's blocks system makes it really easy to store data in a single block type. If you name your form elements correctly and match them to the keys of the table found in your block controller's $btTable variable, you won't need to write a single line of SQL to insert, update or delete data in your database. It's easy to create more complex blocks that use multiple database tables, but you'll have to write database queries to interact with these tables directly – only one table can have its parameters automagically updated when saving the block.
Example: Survey Block
The built-in survey block is a great example a block that uses multiple database tables, because it's more complex than a typical block, but it's still pretty easy to understand. The core properties of the survey, including its question and whether it requires registration are found in the btSurvey database table, which is the $btTable table. That means that any time the block is saved or deleted, the corresponding block ID row from this table will still automatically be inserted, updated or removed.
There are two additional tables, however: btSurveyOptions and btSurveyResults. The options table holds the choosable answers for each particular survey, and the results table holds the chosen responses of those who have filled out the survey. Let's look at how these database tables are managed. (Note: I'm ommitting certain bits of code that, while important for the survey block as it works in Concrete, don't necessarily assist in the understanding of how this works for the average block developer).
db.xml and Table Structure
Like the btSurvey table, the btSurveyOptions and btSurveyResults tables are defined in db.xml. These are just separate
<?xml version="1.0" encoding="UTF-8"?>
<schema
  xmlns="http://www.concrete5.org/doctrine-xml/0.5"
  xmlns:xsi="http://www.w3.org/2001/XMLSchema-instance"
  xsi:schemaLocation="http://www.concrete5.org/doctrine-xml/0.5 https://concretecms.github.io/doctrine-xml/doctrine-xml-0.5.xsd"
>

  <table name="btSurvey">
    <field name="bID" type="integer">
      <unsigned/>
      <key/>
    </field>
    <field name="question" type="string" size="255">
      <default value=""/>
    </field>
    <field name="requiresRegistration" type="integer">
      <default value="0"/>
    </field>
  </table>

  <table name="btSurveyOptions">
        <!-- Fields snipped for brevity //-->
  </table>

  <table name="btSurveyResults">
        <!-- Fields snipped for brevity //-->
  </table>

</schema>
Each of these additional tables also contains a bID column, which is used to join to the original mandatory bID column in the btSurvey table.
save() method
The survey block implements a save() method. When it calls parent::save($args) (where $args is the POST array), that will automatically populate the btSurvey table. But since the survey results are also submitted at this time, additional custom code needs to be written to populate the btSurveyOptions table. This is that code:
public function save($args)
{
    parent::save($args);
    $db = Loader::db();

    $db->query('delete from btSurveyOptions where bID = ?', [$this->bID]);
    if (is_array($args['pollOption'])) {
        $displayOrder = 0;
        foreach ($args['pollOption'] as $optionName) {
            $v1 = [$this->bID, $optionName, $displayOrder];
            $q1 = "INSERT INTO btSurveyOptions (bID, optionName, displayOrder) VALUES (?, ?, ?)";
            $db->query($q1, $v1);
            $displayOrder++;
        }
    }
}
This is pretty self-explanatory. The save() method automatically gets the POSTed form values. The parent::save() method takes care of populating btSurvey, and the posted pollOption values (which are just a series of text inputs with the name pollOption[]) are inserted into the btSurveyOptions table, after being cleared out based on their block ID.
duplicate() method
The duplicate() method is run on a block any time a block on an approved version of a page is edited. THe block is duplicated behind the scenes, receiving a new bID, and storing its data in its $btTable under the new $bID (while retaining the old data.) This ensures that if a page is rolled back to a previous version, the previous block still has its data available (under the old $bID).
Most blocks won't need to implement their own duplicate() method, as Concrete takes care of this automatically – but blocks that depend on this bID parameter to map to their own custom additional database tables will need to extend the built-in duplicate() method. Here's how the survey block does it:
public function duplicate($newBID)
{

    $db = Loader::db();

    foreach ($this->options as $opt) {
        $v1 = [$newBID, $opt->getOptionName(), $opt->getOptionDisplayOrder()];
        $q1 = "INSERT INTO btSurveyOptions (bID, optionName, displayOrder) VALUES (?, ?, ?)";
        $db->query($q1, $v1);

        $v2 = [$opt->getOptionID()];
        $newOptionID = $db->Insert_ID();
        $q2 = "SELECT * FROM btSurveyResults WHERE optionID = ?";
        $r2 = $db->query($q2, $v2);
        if ($r2) {
            while ($row = $r2->fetchRow()) {
                $v3 = [$newOptionID, $row['uID'], $row['ipAddress'], $row['timestamp']];
                $q3 = "INSERT INTO btSurveyResults (optionID, uID, ipAddress, timestamp) VALUES (?, ?, ?, ?)";
                $db->query($q3, $v3);
            }
        }
    }

    return parent::duplicate($newBID);

}
The duplicate() method receives a single argument: the new block ID for the block that has been created. First, the survey block grabs the existing survey options and inserts them into the survey options table under the new block ID. Then it does the same for the survey results.
delete() method
Similar to duplicate(), most block's won't need to implement their own delete() method, since Concrete takes care of clearing out the one row of data found in a block's $btTable database table when that block is officially deleted. Any developer working with a block that uses multiple tables will want to extend this method, however, to ensure that all their data is cleaned up when a block is deleted. Here's how the survey block does it:
public function delete()
{
    $db = Loader::db();
    $v = [$this->bID];

    $q = "DELETE FROM btSurveyOptions WHERE bID = ?";
    $db->query($q, $v);

    $q = "DELETE FROM btSurveyResults WHERE bID = ?";
    $db->query($q, $v);

    parent::delete();
}
Note: In Concrete, a block is only deleted when no more instances of it are referenced in any page version on the site. Don't be alarmed if you delete a block on a page and still see its data in the database; that simply means that an older version of the page exists with that block in it. Delete the page and still see the block? That's because the page exists in your site's trash can. Empty the trash and the data will be deleted.
Complex Form Widgets
Check out the Form Widget appendix for a full list of Concrete service objects that can help you embed rich editing widgets like the file selector, page selector, user selector and more.
Block in a Package
Once you have your package's Controller file created, it's a simple matter to add support for your custom block to the package.
Create a blocks directory within your package's directory. If we're making a package for our audio player block, Let's create a package for it
mkdir packages/audio_player
mkdir packages/audio_player/blocks/
Create a controller file for your package as per the theming instructions listed above. Move your audio player block from application/blocks/audio_player into the package.
mv application/blocks/audio_player packages/audio_player/blocks/audio_player
Change the name space fo your audo_player block to Concrete\Package\AudioPlayer\Block\AudioPlayer (following this pattern: Concrete\Package\{Package Name}\Block\{Block Name}). Note that Block is no plural.
Add a refernece to the \Concrete\Core\Block\BlockType\BlockType class to the top of your controller.
use BlockType;
In your package's install() method, install your block using the Concrete\Core\Block\BlockType\BlockType::installBlockType() method.
public function install()
{
    $pkg = parent::install();
    $bt = BlockType::getByHandle('audio_player');
    if (!is_object($bt)) {
        $bt = BlockType::installBlockType('audio_player', $pkg);
    }
}
Adding Help to Blocks
A good block is usually fairly self-explanatory, with its fields well-named and well-grouped. But sometimes additional help information (including off-site links) is necessary, and a developer would rather not crowd the dedicated dialog interface with this information. Fortunately, its easy to add on-demand to help to a block dialog.

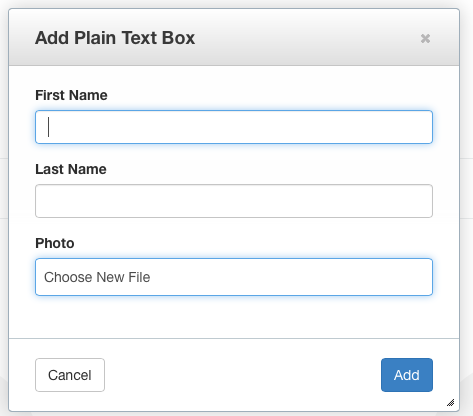
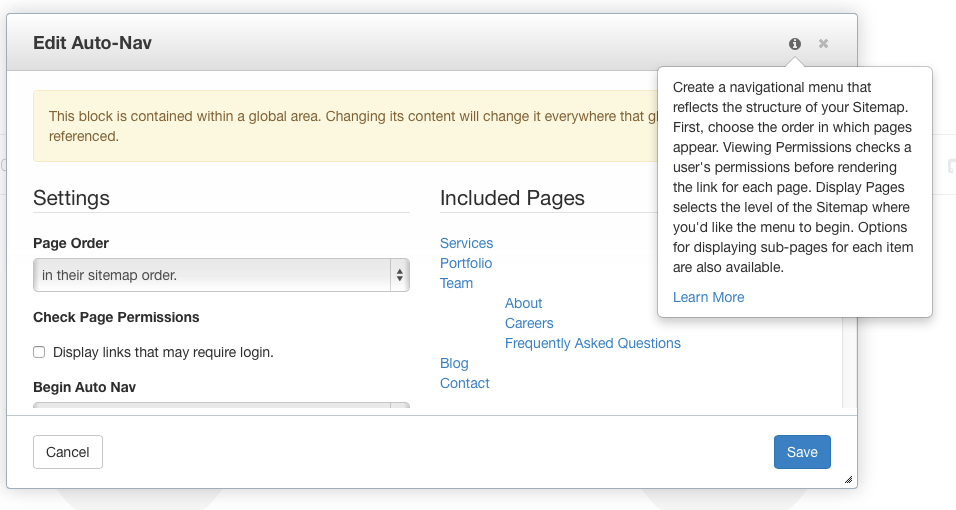
This is what Auto-Nav's built-in help. Let's add something like this to our custom block type. Here's a Plain Text Block in edit mode.
Help Method in the Controller
The easiest way to add help to this interface is by implementing a getBlockTypeHelp() method in the block type's controller.php file. I'll add this to \Application\Block\PlainTextBox\Controller (found in application/blocks/plain_text_box/controller.php):
public function getBlockTypeHelp()
{
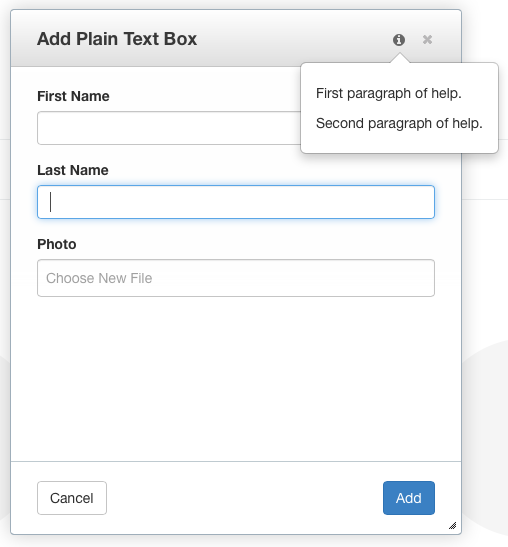
$help = "<p>First paragraph of help.</p><p>Second paragraph of help.</p>";
return $help;
}
That's it! In add and edit mode now your block dialog will now have the help interface available. Clicking on it will show this paragraph.
Centralized Help Registry
Adding a getBlockTypeHelp() method to a controller is certainly the easiest way to add help to a block, but sometimes you'd rather implement all help strings from within one particular area of your application. For example, say the same person is responsible for managing help strings across blocks' interfaces, dashboard pages, and more. In this case, you'll want to implement block type help from outside the controller. In this case, you'll want to get the pointer to the Block Type Help Manager service (which is a global, shared object) and register a new help message on this service.
You can learn more about this in Implementing a Centralized Help Registry for a Package
Inline Tooltips
Want to add inline tooltips to certain form labels that your block uses? This is easy with a combination of Bootstrap and Font Awesome, both of which Concrete ships with and enables in edit mode. Let's add some explanation to the "Last Name" label.

Here's the markup in the block edit template:
<div class="form-group">
    <?php echo $form->label('text', 'Last Name')?>
    <?php echo $form->text('text', $text); ?>
</div>
First, let's change the label helper code into actual HTML. We need to do this because we want to add custom markup inside the label tag.
<div class="form-group">
    <label class="control-label" for="text">Last Name</label>
    <?php echo $form->text('text', $text); ?>
</div>
Now let's add a Font Awesome help icon. I usually like fa-question-circle ()
<div class="form-group">
    <label class="control-label" for="text">Last Name
        <i class="fa fa-question-circle"></i>
    </label>
    <?php echo $form->text('text', $text); ?>
</div>
The results:

This looks great – but it doesn't actually do anything yet. By adding a "title" attribute and a special CSS class, we'll enable Twitter Bootstrap tooltips.
<div class="form-group">
    <label class="control-label" for="text">Last Name
        <i class="launch-tooltip fa fa-question-circle"
            title="This is the last name of this person. Pretty obvious."></i>
    </label>
    <?php echo $form->text('text', $text); ?>
</div>
Much better:
Judicious use of tooltips and block-level help goes a long way toward making a block easy to use and understand.
AJAX & Server-Side Requests in a Block Add/Edit Template
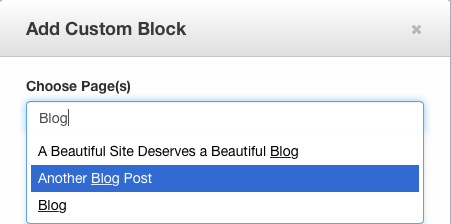
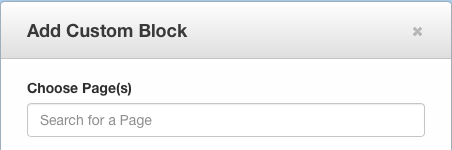
It is not uncommon for a block developer to employ some server-side scripting to pass data dynamically to their block's add or edit interface. For example, let's say we want to use the bundled Select2 library to implement a custom AJAX page autocomplete, in which we can select multiple pages. We don't want to load the entire site tree into a select menu. Here's our custom HTML:
<div class="form-group">
    <?php echo $form->label('fromPages', 'Choose Page(s)')?>
    <div>
        <?php echo $form->hidden('fromPages'); ?>
    </div>
</div>
And our custom JavaScript
$('input[name=fromPages]').select2({
    placeholder: "<?=t('Search for a Page')?>",
    minimumInputLength: 1,
    width: '100%',
    multiple: true,
    ajax: {
        url: "/path/to/serverside/script",
        dataType: 'json',
        quietMillis: 250,
        data: function (term, page) {
            return {
                q: term
            };
        },
        results: function (data, page) { // parse the results into the format expected by Select2.
            var results = [];
            $.each(data, function(i, concretePage) {
                results.push({'id': concretePage.id, 'text': concretePage.name});
            });
            return {
                results: results
            };
        },
        cache: true
    }
});
This snippet gets us this: a nicely styled select2 box that, when typed in, will send its request to the server and look for a response. It'll then store that data in a hidden variable, which will be submitted when we save the block.
This select2 snippet is documented well at the select2 documentation linked above. Basically, the moment someone starts typing, a server-side request will be made to /path/to/serverside/script?q=keywords (where keywords is whatever is typed in the box.)
First, change the URL parameter above to:
url: "<?=$view->action('load_pages')?>",
Now, whenever the user types in the select2 box, a special AJAX request to a custom core route will be fired, and all the relevant information about the block type or block will be passed through. Permissions will be checked, and the request will automatically be routed to action_load_pages in the block's controller. Let's implement this method:
public function action_load_pages()
{
    $pl = new \Concrete\Core\Page\PageList();
    $pl->filterByKeywords($this->request->query->get('q'));
    $pl->sortByName();
    $pl->setItemsPerPage(20);
    $results = $pl->getResults();
    $data = array();
    foreach($results as $page) {
        $data[] = array('id' => $page->getCollectionID(), 'name' => $page->getCollectionName());
    }
    return new \Symfony\Component\HttpFoundation\JsonResponse($data);
}
This is pretty simple. First, we instantiate an instance of the \Concrete\Core\Page\PageList class (which has many methods to assist in the filtering of pages) and query pages based on the 'q' parameter in the query string. This q parameter is automatically comprised of whatever the user types in the select2 box. Next, we sort and paginate our results, and get 20 of them. Next, we turn our data into something that select2 is going to be able to work with: JSON. We're going to return an array of JSON objects comprised of id (page ID) and name. And finally, we return that JSON response. Block AJAX actions should always return an object that's in instance of the \Symfony\Component\HttpFoundation\Response). This could be a regular HTML response, or a JsonResponse as in this example.
Now let's look back at our JavaScript. Select2 takes care of handling our JSON response in these lines:
results: function (data, page) { // parse the results into the format expected by Select2.
    var results = [];
    $.each(data, function(i, concretePage) {
        results.push({'id': concretePage.id, 'text': concretePage.name});
    });
    return {
        results: results
    };
},
Our data is simply a JSON object comprised of our JSON response. Each object has an id parameter and a name parameter. We tweak that data to get it into a format that select2 can work with, and send it back to select2.
And that's it! We have AJAXified our select2 box!