Creating a New Block
Blocks in Concrete CMS are editable elements seen by website visitors. The default installation offers over thirty block types, ranging from rich text and multimedia to interactive features like forms. Site editors can easily modify blocks, while developers can extend or create new ones.
Anatomy of a Block
In Concrete CMS, a block is simply a collection of files in a directory, and some behind-the-scenes registrations that let Concrete know that the block is there and ready to be used.
Location
- Core Concrete blocks are found in
concrete/blocks/ - Blocks provided by marketplace items or custom packages can be found in
packages/<package_handle>/blocks - Custom block types (like in this tutorial) are found in
application/blocks.
Handle
Like other things in Concrete, a block type has a handle. This is a lowercase-only, non-spaced string that describes the block type in the filesystem. Examples include content, youtube, page_title, etc…
If we're creating a block type that we'd like to refer to as a "Hello World!" block, we'd give it the handle of hello_world, and it would be found in application/blocks/hello_world/.
Contents of a Block's Directory
view.php
Required. This file is the template displayed when a block is rendered on a page in Concrete.
add.php
Optional. This file is the template displayed when adding this block through Concrete. Usually this is shown in a dialog window. If this file is ommitted, the block will be added to the area and saved the moment it is dragged into the page.
edit.php
Optional. This file is the template displayed when editing the block through Concrete.
controller.php
Required. This file contains a PHP class for this block type, which in turn contains vital information about the block type, including its name, description, dialog interface dimensions, and more. Additionally, different methods defined in the class can pass data through to the add, edit or view templates, and specify how the block saves its data.
db.xml
This file is required for any block that needs to save its data in the database-- which is most of them. This file contains an XML description of the database tables needed, in the Doctrine XML format. For more information, see db.xml in Doctrine XML Format section of Custom Database Tables.
auto.js
Optional. If this file exists it is automatically included when the blocks is in add or edit mode. (Note: this file will only be included once per page load.) This can be useful for JavaScript that should run when interacting the block's edit interface.
icon.png
Optional but Highly Recommended. This graphic displayed in Concrete's interface whenever the block is listed. This icon should be square, and at least 50x50.
templates/
Optional. Contained within this directory are alternate views for instances of this block, which can be set as custom templates through Concrete. For example, the typical autonav block formats its entry as an unordered list, but the "Header Menu" template can be applied to the autonav block, which then restructures the menu with DIVs.
scrapbook.php
Optional. This is an alternate view layer to view.php which will be substituted whenever the contents of this block are listed in the scrapbook. This can be useful for blocks that contain complex JavaScript or multimedia content.
composer.php
Optional but Recommended. This is a combined add/edit interface for a block type that enables it to be used in Composer view.
Handling the Adding of a Block
When a block type is dragged from the Add Panel onto a page, the following things occur:
If there is no
add.phptemplate, we automatically skip to step 5 (?) below.If the block does not support inline editing, a Concrete CMS dialog is displayed, set to the dimensions specified in the block controller's
$btInterfaceWidthand$btInterfaceHeightvariables.If this block does support inline editing, the dialog is not displayed and editing begins within the page itself.
The
add()method in the controller is run (if it exists) allowing any necessary data to be injected into the add template. Optional. If there are default parameters that the combined template uses, they can be set from within this method.The
add.phptemplate is rendered and returned to the browser. This content is injected either directly into the page (if inline editing is supported) or otherwise into the modal dialog.When the block is saved, the Controller's
validate()method is run. If aConcrete\Core\Error\Errorobject with errors is returned, these are displayed and the process terminates. Otherwise, thesave()method is run.The completed block is rendered to the page (see Handling the Rendering of a Block below).
Handling the Editing of a Block
A block may be edited by clicking and choosing "Edit" from the menu. When this occurs, the following takes place:
The Controller's
edit()method is run (if it exists), allowing any necessary data to be injected into the edit template.All database columns for this block (from the block's
$btTable) are queried and automatically injected for use within the template.The
edit.phpfile is rendered and returned to the browser.Variables from both the database and controller are available in the local scope, so if the
$btTablehas a column entitledcontentyou can simply do this in edit.php:<input type="text" name="content" value="<?= $content ?>">When the block is saved, the server runs the same processes as when adding the block for the first time (see above).
The completed block is rendered to the page (see Handling the Rendering of a Block below).
Tip: Since the "add" and "edit" forms are usually extremely similar, you can avoid repetition by placing the code in edit.php and simply include this from add.php.
<?php $view->inc('edit.php') ?>
Handling the Rendering of a Block
When a block is rendered to a page (after being added/edited) the following things occur:
The Controller's
view()method is run (if it exists), allowing any necessary data to be injected into the view template.All database columns for this block (from the block's
$btTable) are queried and automatically injected for use within the template.The
view.phpfile (or a custom template, if selected) is rendered.Variables from both the database and controller are available in the local scope, so if the
$btTablehas a column entitledcontentyou can simply do this inview.php:<div class="ccm-block-type-custom-block-field"><?= $content ?></div>
PHP Controller
controller.php contains information about our block, as well as methods that automatically get run when different things happen to our block.
Namespace
First, we have to give our block the proper namespace. Since this block is a custom Concrete CMS block living in the application/ directory, the first segment is Application. Next, we add Block (since all blocks have this as their second namespace segment), and finally the camelcased version of block type handle. So, if our block is has the handle hello_world, this would be our namespace:
<?php
namespace Application\Block\HelloWorld;
Extend the Core Block Controller
Next, we have to include the core block controller from Concrete, which our Controller class will extend.
use Concrete\Core\Block\BlockController;
Class Definition
Finally, let's create our class.
<?php
namespace Application\Block\HelloWorld;
use Concrete\Core\Block\BlockController;
class Controller extends BlockController
{


}
Class Properties
Database Parameters
$btTable
The block's primary database table. If specified, and if the block only uses this one database table, then the block will be able to automatically save its information to this table, provided the block's form fields map directly to the columns in the database. This value will also be set in db.xml.
Organization
$btDefaultSet
Defaults to null. If a valid Block Type Set handle is passed, the block type will be installed in this set automatically, and will show up there in the Add block interface.
Interface
$btSupportsInlineAdd
A boolean value that specifies whether the block supports inline editing when added to a page. Defaults to false if unspecified.
$btSupportsInlineEdit
A boolean value that specifies whether the block supports inline editing when edited in a page. Defaults to false if unspecified.
$btInterfaceWidth
The width in pixels of the modal popup dialog box that holds this block when it is added or edited. Does nothing if hte block supports inline adding/editing.
$btInterfaceHeight
The height of the modal popup dialog box in pixels that holds this block when it is added or edited. Does nothing if hte block supports inline adding/editing.
$btIgnorePagethemeGridFrameworkContainer
Defaults to false. If set to true, and this block is added to a page that is within a theme grid container, this block will not be contained within that container. Useful for full-width blocks like Horizontal Rule, Image Slider.
Caching
$btCacheBlockRecord
Defaults to true. When block caching is enabled, this means that the block's database record data will also be cached. This can almost always be set to true.
$btCacheBlockOutput
Defaults to false. When block caching is enabled, enabling this boolean means that the output of the block will be saved and delivered without rendering the view() function or hitting the database at all.
$btCacheBlockOutputLifetime
Defaults to no time limit (0). When block caching is enabled and output caching is enabled for a block, this is the value in seconds that the cache will last before being refreshed.
$btCacheBlockOutputOnPost
Defaults to false. This determines whether a block will cache its output on POST. Some blocks can cache their output but must serve uncached output on POST in order to show error messages, etc…
$btCacheBlockOutputForRegisteredUsers
Defaults to false. Determines whether a block that can cache its output will continue to cache its output even if the current user viewing it is logged in.
Advanced
$btExportPageColumns
Defaults to an empty array. When this block is exported, any database columns found in this array will automatically be swapped for links to specific pages. Upon import they will map to the specific page found at that path, regardless of its ID.
$btExportFileColumns
Defaults to an empty array. When this block is exported, any database columns found in this array will automatically be swapped for links to specific files, by file name. Upon import they will map to the specific file with that filename, regardless of its file ID.
$btExportPageTypeColumns
Defaults to an empty array. When this block is exported, any database columns found in this array will automatically be swapped for references to a particular page type. Upon import they will map to that specific page type ID based on the handle specified.
$btExportPageFeedColumns
Defaults to an empty array. When this block is exported, any database columns found in this array will automatically be swapped for a reference to a specific RSS feed object. Upon import they will map to the specific feed, regardless of its ID in the database.
$btIncludeAll
Defaults to false. Determines whether this block should include itself as is on all versions of a page. This will disable versioning for this block type. Note: this is not recommended, but sometimes it is necessary given the architecture of a block type.
$btCopyWhenPropagate
Defaults to false. When a block is aliased from page defaults or from another location, setting this to true will cause that block to copy itself, rather than alias back to the original block.
Required Methods
getBlockTypeName()
Returns the block type's name, as it will be shown in the Dashboard and the Add Panel. Usually this should be returned in a t() string, so that it can be translated.
getBlockTypeDescription()
Returns a short description of the block type.
<?php
namespace Application\Block\HelloWorld;
use Concrete\Core\Block\BlockController;
class Controller extends BlockController
{

    public function getBlockTypeName()
    {
        return t('Hello World');
    }

    public function getBlockTypeDescription()
    {
        return t('This is my sample block.');
    }
}
Optional Methods
add()
If present, this method will automatically be run when the add template is rendered (whether in the page for inline editing or through the dialog for traditional Concrete block adding.) If no add template is present, this method will not be excuted.
edit()
If present, this method will automatically be run when the edit template is rendered (whether in the page for inline editing or through the dialog for traditional Concrete block adding.) Like add(), if no edit template is present, this method will not be excuted.
validate()
This method will be run automatically any time add or edit interface is submitted to the backend to be saved. If this block returns a Concrete\Core\Error\Error() object with any messages inside it, those will be displayed to the user and the block will not be saved.
save($data)
This method is automatically run when a block is submitted to the backend to be saved. If this method is omitted, the block will be saved based on the variables found in the $data array. This $data array is populated from entries in the POST. These variables will be mapped directly to columns found in the $btTable database table, and attempted to be saved automatically. This can be extended or overridden entirely by defining a save() method in the controller. That means that if your add.php or edit.php file contains a form element with a particular input name, that name parameter will be found in the $data array of the save() method. If you alter the $data you need to call parent::save($args); to save the altered $data.
duplicate($newBlockID)
This method is automatically run any time a block is duplicated. This happens automatically in Concrete when versioning blocks and pages. If this method is omitted then the data row in the $btTable database table will be duplicated with the bID parameter found in that table getting the value of the $newBlockID parameter. Duplication operations can be extended for blocks that use multiple tables by specifying a custom duplicate() handler.
export(SimpleXMLElement $blockNode), import($page, $areaHandle, SmpleXMLElement $blockNode)
These methods are run automatically when exporting and importing blocks of this type. Most of the time these can be omitted but custom import/export routines are possible.
delete()
This method is automatically run when a block is deleted. Note: this may not happen very often since a block is only completed deleted when all versions that reference that block, including the original, have themselves been deleted. If this is omitted the delete() operation simply deletes the row from the $btTable database table that has the block ID parameter of the current block ($bID).
getSearchableContent()
If present, this method provides text for the page search indexing routine. This method should return simple, unformatted plain text, not HTML.
Installing or Updating Your Custom Block Type
When your custom block type is ready, you can simply install it from Dashboard > Stack & Blocks > Block Types.
Updating a Custom Block Type
Once a custom block type is installed, if you make changes to its db.xml file these changes won't automatically be applied to the block's database table. You can manually apply these database changes, however, by a process called "refreshing." First, find the block in the list of block types on this page. Then, click on the entry to get to a screen that shows you how many times the block has been placed:
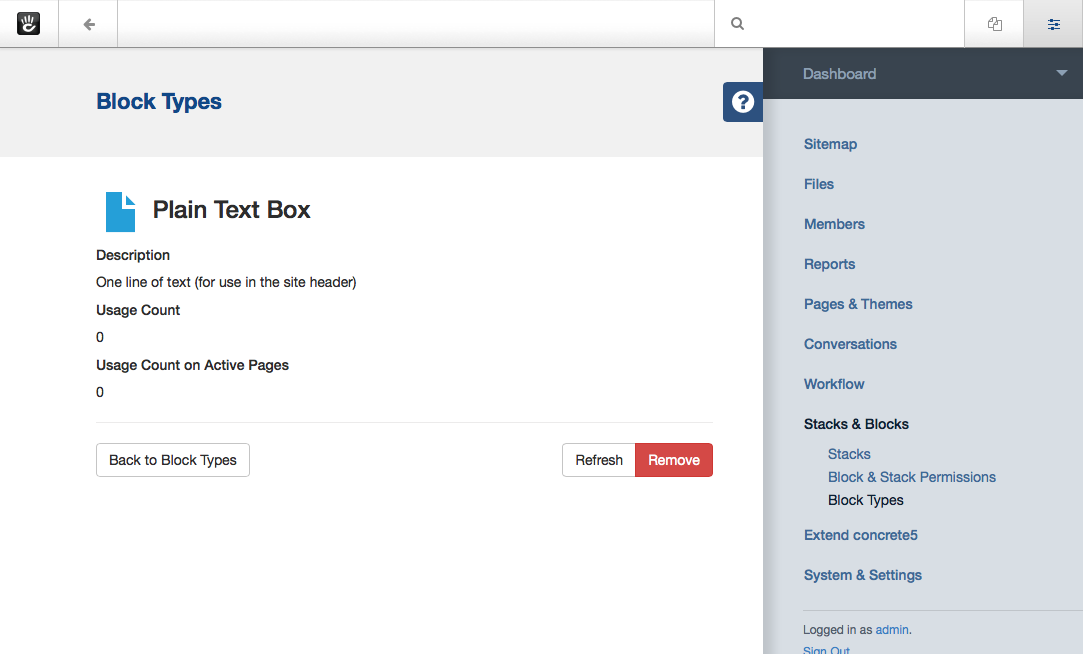
From here, you can click the Refresh button to rescan the block controller and db.xml files. The following items will be updated:
- The block dialog width
- The block dialog height
- The block database table (as drawn from db.xml)
You can also remove a block type from this interface by clicking the Remove button.
Sample Block: Hello World
At this point, it might be easiest to see a simple, sample block type in action.
Download Block Type
Hello World Block Type (Download ZIP file)
Just install this block type and add/edit it through Concrete CMS. It creates the database table btHelloWorld and saves its data simply. It even contains a simple example of block validation.